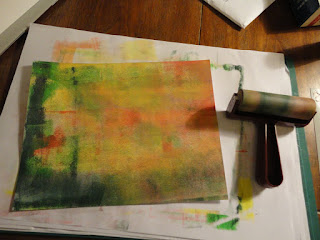
The challenge is to use sponging or brayering.
I decided to try an abstract brayered background, with acrylic paint. One of those techniques where you don't know quite how it'll turn out! A bit of a gamble maybe but I had time to redo it if needed! And as I need a lot more Christmas cards made quickly, I had a plan for another sponged card up my sleeve.
On a Clarity stencil card base, I used primary yellow, cherry red, bright green, forest green and cobalt blue paint, walking the brayer across the card.
It's also a case of knowing when to stop - although I kept going on this and it got better, softer and more luminous.
For a focal point, I used a reindeer cut with a Tattered Lace die. This is one of my favourites, I think it's very striking. I chose black glitter card, to give a dramatic contrast to the background.
I tried it on the background in different areas and orientations until I found the section I wanted to use. My circle dies weren't big enough for the piece I wanted to cut, so I fell back on my Fiskars cutting system.
The next step was is add some sponged hills to ground the reindeer and give him something to stand on. I tore copier paper to create a mask, then applied distress ink with a sponge - pine needles and aged mahogany, with touches of chipped sapphire.
To mount, I cut a larger circle from self adhesive black encapsulated glitter card. The reindeer die wouldn't cut this, it was too plastic and just stretched, but the Fiskars system, which has a blade, cut it fine.
The circle then went onto a slightly larger white square, and I edged it in black with a sharpie pen. I tried to photograph it, but the combination of white and reflective black in artificial lights was too much for my camera/photography skills!
I attached the reindeer to the brayered background with PVA, then mounted the circle into the glitter circle with foam tape.
At this point I felt that the hills looked a bit wishy washy compared to the reindeer, so I "reinforced" the front one with black soot distress ink.
As a finishing touch, I used the black glitter swirls that came out of the reindeer die in the corners. This meant cutting another reindeer out, which went into the stash but only briefly - see the next post after this one!


Absolutely stunning! I love the gorgeous background. The die cut deer is so pretty and I do like the way you've used the little bits in the corner of your card. Thanks so much for playing along with 52CCT this week. Good luck with the DT Call!
ReplyDeleteThanks Deborah. I'm really enjoying all the new techniques I'm getting to try out in playing the challenges. These messy unpredictable backgrounds are lots of fun. If I build up a bit of confidence I might even try it on a canvas instead of card!
Deletelove the brayered background - thanks for sharing your project at the 52CCT
ReplyDeleteThanks Tanya, glad you like it.
Delete