Pages

Showing posts with label decoupage. Show all posts

Monday, 13 March 2017

A not-so-new home


This is a card I made for a friend who moved house last year. It's taken a while to get around to blogging it!

I used a new stamp from Lavinia Stamps. They are a new company to me, with very whimsical, fantasy style designs. A lot of fun!

I started by stamping the house in black archival ink, on Clarity stencil card.


I painted over it with pebeo masking fluid, then started to brush in the background, with distress inks and Clarity stencil brushes.


Mowed lawn at the bottom, then salty ocean, dusty concord, and chipped sapphire to darken the top.


I added the words with Clarity word chain stamps. The "new' is from news with the s masked, then I used the "H" of harmony, and "ome" from awesome. The spacing isn't quite right on the "Home", I'll sort that out later.


With the masking fluid rubbed off, the house really stands out.


I coloured the house using brightly coloured marker pens, and I think I painted with distress ink in some of the larger areas. I wanted it to be very vibrant.


I also added more ink around the base, to ground the house.

To add interest to the words, I stamped around with small decorative stamps, again in black archival. The stars are another Lavinia stamp, the spirals come from a charity shop pack.


I've also balanced out the letters of "Home", by making the "o" wider on one side, with circles within the thicker area.


To finish, I edged with a black sharpie, and mounted on an 8x8 card blank.


I'm still really pleased with how this came out. I like the intensity of the colour, and how vivid the house is. They really carry it, the card layout is so simple.


When I visited my friend in her new home, I was amused and pleased to see several handmade gifts I'd given her over the years on display. We go back a long way! So here are a few of my crafty blasts from the past!


This photo frame is decorated with stamps and paint, with ribbon flowers and buttons on the side.


I decoupage this box photo frame when her son was born. Next time I visited, there were photos in it!


Glass painting used to be my primary craft! I would love to get back into it (so many crafts, so little time!). I think the set of 4 wine glasses were a gift when she moved into her previous flat. The tea light holders are also a set of four.

This canvas was gift a few years ago. I love the colourful butterflies, I think if I were doing it again I'd space it differently and have more flat butterflies so the letters are clearer.


Thursday, 27 October 2016

Harvest Festival Favours


Today I'd like to share with you the wedding favours I recently made for friends. And I'm going to submit them for the October Berkhamsted Creative Challenge, as they fit the theme of Harvest festival - Time of Plenty, with their Autumnal colours and edible filling.


Let's start with the samples I made for Becci and James to choose from.


The box in front is based on the meadow from my walled garden piece. They all use the dragonfly stamps, from Sheena Douglass.

The design they chose is a mixture of the two jars shown behind.

There are different parts that came together to make these favours. Let's look at the lids first. (The jars are the 110ml hexagonal glass jars from Hobbycraft.)


I painted the gold lids with white gesso, then decoupaged them with a decopatch paper.

The dragonflies are the larger stamp in the set. I stamped with versa mark onto heat proof acetate, heat embossed in gold and cut out with scissors.

For the flowers, I used a sheet of double sided adhesive. I attached it first onto the wrong side of gold paper (so the reverse is gold).

I then peeled off the other backing, and started adding to the sticky surface. First came gilding flakes, dotted across. Then glitter in bronze, gold and brown shades, including some tinselly pieces. I dusted gold shades of mica into some areas, then finished with gold and platinum embossing powder in the gaps, which I heated to set.

This is the first sheet I made:


And here's the second version, with more gilding flake and less mica. (It's also bigger.)


I love the texture this creates! It's fun too, basically you throw everything you have at the sheet.

I then die cut flower shapes from the sheets and layered up to form 3D flowers. I attached these to the lids, and the dragonflies to the flowers, using a glue gun.


On the jars themselves, I heat embossed the couples initials, R and J (Becci was Rebecca for this). I didn't know if heat embossing onto glass would work, but had a go, and it did. It just takes a long time to turn, as the glass absorbs more heat than card, and then takes a while to cool again.


The next step was the mini envelopes. These were cut from parchment using a punch, then embossed using the Groovi system. I added the fold lines, the names of the guests (the favours became place settings as well) and a twirly flourish.


To colour them, I sprayed them with gold paint from behind.

Inside, they each had a personalised printed message, which I edged with a brown sharpie pen to finish them off.

I pierced the corner of each envelope, and made a ring from wire to feed through to attach them.


I threaded the envelopes onto organza ribbon, along with a selection of beads, and feathers (I wired these with a spiral round the "stalk" and a loop, to be able to thread them on).

The ribbon was wrapped around the jar, with the knot hidden inside a bead. I used a dab from the glue gun to hold them in place.

I filled the jars with colourful dried fruits and seeds, arranged in layers.


When you see them all together, they make quite the swarm!


In situ they look rather more the part. What a beautiful table!

And many congratulations to Becci and James.


Saturday, 30 July 2016

Baubles

It's been a while since I posted - lots going on! Not least, I spent a very enjoyable few days at the Clarity Retreat, my first time going. Such fun, and learnt a lot too.

So I'm a little delayed in posting my entry for the Berkhamsted Creative Challenge this month - I did have these ready to go a few days ago.

The theme is "Circles".

Berkhamsted Creative Challenge July 16 - Circles

I posted this teaser photo mid month:


5 spheres on sticks - can you guess what they are?

Know what they are? This might help:

Plain cream plastic bauble

I bought a set of 12 of these in a cheapy junk shop years ago, and I'd never got round to doing anything with them. So this is a big tick for my personal "use something that's been hanging around unused for ages" challenge. I'd removed the hanging bit and painted them with gesso for the teaser photo, and had them drying on kebab sticks.

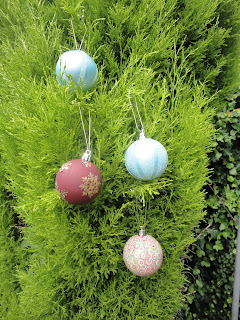
I haven't done all of them yet, I have lots of different ideas to try - and need to test if they will withstand a heat gun without melting. But here are the four I have finished.

Bauble decoupaged in red, green, gold and white Christmas paper


This one I decoupaged with a Christmas paper I've also had for ages without using.


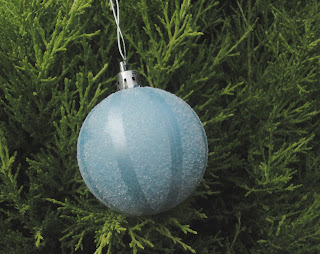
Blue pearl bauble with white glitter segments
Here I started with a couple of layers of pearl paint, then masked off strips with a narrow masking tape. I painted over with PVA, removed the tape and sprinkled a white glitter over. I used cheap hairspray to seal it.

Blue pearl bauble with white glitter stripes


This is a mirror mage of the one above - I started by painting it as before, then added strips of super sticky tape instead of the masking tape. I added the same glitter and hairspray varnish.


Claret coloured bauble with gold metallic snowflakes
This one was painted with claret fresco chalk acrylic paint. It's translucent, so needed three coats, but is such a glorious colour.
I then stuck some scraps of adhesive sheet to copy paper, and applied gilding flakes to it. I die cut snowflakes, using the smaller Tattered Lace snowflake dies, and glued them to the bauble. I used PVA, but next time I think I'd use a thin adhesive sheet on the back before die cutting, as it was a bit messy.

Four decorated baubles in a fir tree

So four new baubles to go into the Christmas decs box, eight more to play with before December.

Sunday, 22 May 2016

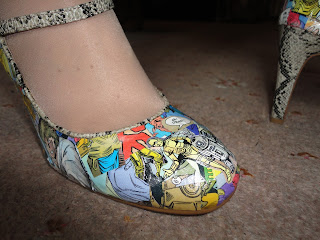
Artoo-De-Shoe

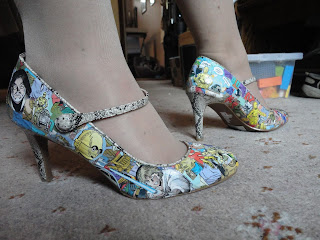
Shoes decorated with Star Wars comic book images

Something a bit different today, and very exciting!

I've mentioned before that my best friend Susan and I like to do crafternoons and try new crafts. It started with my hen do, when we all spent a very enjoyable afternoon making paper flowers, which then adorned the chairs at our reception.

Well, it's her birthday this month and mine next, and a post I chanced to see on Facebook led me back to the page of the lovely lady who ran that hen do crafternoon, Claire Mackaness, and the perfect craft for us to celebrate with; Comic Book Shoes

This one required a bit of preparation to find the materials. I got the shoes on sale for £9 (bargain - they only had one pair in my size otherwise I'd have got more!) then headed for a comic book shop. I think the guy there was quite upset at the idea of cutting them up (hubby wasn't particularly happy either) but they both helped me find a few - including 3 for free - that might be suitable.

So yesterday we headed over to Brentwood to Claire's studio.

The process is basically decoupage. Having said a few weeks ago that I hadn't tried the dedicated decoupage glue/varnish, yesterday I did. Although this itself was a stand in for mod podge, which Claire would usually use. It's a lot thicker and quicker drying than the PVA and water I'm used to. But it reduces the bubbling, so I think is particularly suitable for use with thicker papers.

We first went through the comics to cut out specific images we liked and wanted to use. Having seen "The Force Awakens" last week, I went for the Droids magazine - plus C3PO's gold colour matched my shoes!

We then cut some pages into random small squares for the background. These we applied to cover the whole of the body of the shoe. The glue went onto the shoe first, then the square of paper, then another layer to seal the square down. The glue softens the paper a bit so it curves with the shoe, although some areas were a bit trickier and required much smaller pieces. And some pieces of paper just refused to stick for no apparent reason!


Shoe partially decorated with random pieces from a comic book

I didn't think to take photos of the shoes before I started, but here's one partially covered.

This is what they looked like with the background layer complete.


Shoe decorated with random pieces from a comic book

I've glossed over the process a bit - this took us at least three hours to do!

The next stage was to place the images we'd selected over the background, again applying glue under and over the paper. This went relatively quickly, although you could take ages deciding on the layout you want.

And, with a short drying time, my shoes were finished!


Shoes decorated with Star Wars comic book images

I'm so pleased with these - so here are lots of pictures showing them off!

Shoes decorated with Star Wars comic book images
The glue doubles as a varnish, giving a slightly glossy finish. We could add a coat of yacht varnish to make them splash resistant as well.


Shoes decorated with Star Wars comic book images
(Must take the stickers off the soles!

Shoe decorated with Star Wars comic book images

You can also get glue/varnishes with sparkle in, which would give a slightly different look.


 There's enough flex in the glue/varnish that they feel like normal shoes to wear, although they probably won't stand up to too much wear. 
Shoe decorated with Star Wars comic book images


The odd crack etc could be covered by adding another piece of paper with the glue.

Shoes decorated with Star Wars comic book images


There's also the option to add glitter to the heels and/or strap - I haven't decided whether I'm going to try this.


Shoes decorated with Cat Woman comic book images
And here are Susan's Catwoman shoes - how gorgeous! I love the colours, and the speech bubbles she's added to them.


Shoes decorated with Cat Woman comic book images


She's planning to wear these on the school run this week!


I'm definitely on the look out for an occasion to wear mine - my days of heels everyday are behind me!

But I am keen to try another pair - more practical flats or a low heel this time - after all I have 4 comics untouched, as well as some of the droid one left.

You could use all kinds of papers. Another woman at the workshop used magazine cuttings, which looked amazing, or wrapping paper, or even decoupage papers!

I wish I'd seen this technique before I got married, as this would be an amazing way to make bespoke wedding shoes.

And of course, the technique isn't restricted to shoes - I have quite a collection of items to be decoupaged that I haven't got around to yet, so maybe I shouldn't get carried away, but this does open up the possibilities.


Saturday, 30 April 2016

A blue bird for Bethany

Decoupaged birdhouse with knitted bird

The April challenge at Berkhamsted Creative Challenge is All Creatures Great and Small. 


Which gave me a good excuse to complete a project for Bethany which, if I'm honest, was supposed to be a Christmas present.

It all started with a wooden decorative bird house I found in a charity shop. Bethany loves birds (va va's) so I thought it'd be great decorated in her room.

It came as plain wood, although I didn't get a picture of that.

I started with a coat of gesso to prime the wood a bit and give a light under colour.

Wooden birdhouse with coat of gesso

I then repainted the roof in blue to match the paper I wanted to add. With all those grooves I was bound to miss a bit, and if the undercoat was the same base colour it wouldn't show nearly as much.

Wooden birdhouse with coat of gesso and blue roof

I then decoupaged the birdhouse, using deco patch papers. I've had these a while, I can't even remember what the blue was bought for (I know the white I used on the picture frame that was the first thing I ever decoupaged). 

I use a water and PVA mix - it gives a nice matt finish that I like. I've never tried the varnishes you can buy specifically for decoupage, so can't say if they're better, or just different - one day I'll want a gloss finish, or do something for outside, then I'll splash out on the proper stuff.

Wooden birdhouse with coat of gesso and blue decoupaged roof

I tore the paper into pieces, but also made use of the straight edges of the paper, for the edges where the two different papers met.

For the bird, I used a pattern I downloaded from Ravelry, called the Bluebird of Happiness. It's a good, easy to follow pattern, quite simple but fiddly, using double ended needles for something so small.

I had a blue mix yarn, again, no idea what I bought it for, but I did use it to make a squid for hubby last year.


Cat investigating decoupaged birdhouse and knitted bird


Even the cat was showing some interest !

Three card birdhouses in different shapes


And, as Berkhamsted Arts and Crafts has got a variety of birdhouse shapes in that I couldn't resist, Bethany will have a little village, and a flock of birds, to adorn her room.