Pages

Saturday, 6 February 2016

Lovely Lily

New baby card for Lily Rae, green resist background with parchment tag


New baby card for Lily Rae, green resist background with parchment tag


Tonight's card was made for my friend's new baby, born at the start of the year.

I started with Stamps Away stamp and colour coated card, cut down to A6. I stamped the Heartfelt Creations Sweet Lullaby background stamp in watermark ink, then blended bundled sage distress ink over it. The watermark ink worked as a resist, leaving the stamped image in white.

Green resist background

This is my background, I wanted a personalised topper that wouldn't cover it too much.

Parchment fits the bill - I cut a tag using a die, then added boxes and the name with my groovi plate mate.

I used a border plate to give the tag a border, going freehand around the corners.

Parchment tag with Lily Rae boxed letters

I coloured the letters (from behind) with a sharpie pen.

Finally, I used a small piece of ribbon in the tag's hole, and attached it with a small piece of double sided tape.

I used zeta hammered card in white for the card base, I think this is so pretty and soft, perfect for baby's cards.

Simple but effective!

Friday, 5 February 2016

Ooh, shiny


Gold gilded Christmas card with reindeer and Noel


I'm very excited about this week's stash/technique challenge at 52 Christmas Card Throwdown as it's foils/gilding.

52 CCT Stash challenge - foils/gilding

I love gilding flakes, so I'm in my element with this one (I don't have foils so that was an easy choice to make!).

Having said that, I did struggle with the composition a bit - I had an idea in my head of what I wanted to do, but couldn't quite work out how to get it onto a card. There was much standing around holding different bits and pieces next to each other last night, before I settled on this design.

The first step was to cut my Christmas images from hint of gold Centura Pearl card. These are all tattered lace dies.

Reindeer and present die cuts in hint of gold Centura Pearl


I decided to use the reindeer this time (it's a real favourite of mine), the others will go in the stash.

Next I took a double sided adhesive sheet, removed the wax paper from one side and stuck it to sheet of thin card.

I took off the other wax sheet, and placed the reindeer die cut onto the adhesive. Then I covered the remaining sticky surface in gilding flakes. I used Autumn Leaves by Bitsy Bobs & Doodads, a gold and copper mix. Some flakes I spread out flat, other were more bunched up, then I used a firm sponge to spread them out, rubbing them flat and spreading the little bits to cover the whole sheet. 

Gold and copper gilded sheet with die cut white reindeer

I think this gives a nice variety in texture, I just love this effect, and it's so satisfying to do.

After that, and working out what I wanted to do with it, it was a case of cutting and sticking.

I cut a panel with the reindeer, then a strip the same height. With the rest I used a Tattered Lace corner die twice, and an X Cut alphabet die to spell out Noel.

I stuck the panel and strip down with a tape pen, then used PVA spread on the back of my hand for the die cuts. If you spotted that the "L" is slightly wonky, my daughter woke up crying as I stuck it on, so I didn't get to straighten it before it dried!

I used a gold card for the card base, with a very narrow border, to match the gilding.

Gold gilded Christmas card with reindeer and Noel

Gold gilded Christmas card with reindeer and Noel


Gold gilded Christmas card with reindeer and Noel close up


So that's one of my favourite dies and favourite techniques to make a very shiny, very Christmassy gilded card.

Sunday, 31 January 2016

Say it with flowers - Clarity January Challenge


Here's my entry for the ClarityStamp January Challenge - Say it with flowers.

I'm very last minute to upload this, so I'm going to link it up now, and come back and fill in the steps afterwards!

…………………………….

So, now I'm back with the details. Where did January go, it hardly seems a month since this challenge was set!

I started this card with the background. I used the seed heads stencil; it's sort of flowers after all. It's part of the crafty bundle I got for Christmas so it's a good chance to have a play with it.

I put the stencil onto the gelli plate and brayered bundled sage distress ink over it. I removed the stencil and pulled a print on 7x7 stencil card.


I cleaned the gelli plate and then placed the inky stencil onto it to transfer the ink, and pulled a second print.


That's one for the stash.

I wanted to add to the first print, so I inked up the stencil in antique linen distress ink, transferred it to the gelli plate and lined it up with the existing print, to "fill in" the white areas. As the print from the stencil is narrower than the void from printing "around" the stencil, there's a white halo. I didn't get it quite lined up, but that doesn't matter, it's a nice effect. The colour was very subtle though, so I repeated the process with bundled sage.


Next I turned to the main image. I used the Shepherd's purse stamp, another Christmas goodie. I just used the largest stamp from the set, and stamped in black permanent ink onto stencil card.


I'm not much of a colourer, so I kept things simple. I just used distress inks, bundled sage and tattered rose mainly, and then antique linen to add shadow. I cut the card back as well.


I got out my stencil brushed to add antique linen around the image to soften the white of the card. I also ran the ink pad around the edges to give a sharp border.


The final touch was a tie around the bottom. I raided my (sizeable) yarn stash to find something suitable.


Next was a second layer to go underneath this topper. I cut another piece of stencil card the same size, and stamped the flower section of the same stamp over it in bundled sage, covering all the areas that would be visible. I softened it by brushing the same colour over the card, and added a sharp edge again.


Next I cut back my background, cut a plain white square layer, and edged them both in bundled sage.


I had all my elements, I just needed to combine them and mount on a card base - I cut an 8x8 base down slightly to get the size that suited. I used foam tape under the toppers and the background for dimension.


And there you have my flowery offering.

Next month I will try to be a bit less last minute! But then, I've said that before.

Thursday, 28 January 2016

Candle in the snow


Christmas card in turquoise and gold with candle and snowflake background

It's a theme week at 52 Christmas Card Throwdown this week, and the challenge is to make a card featuring candles or lanterns.


52 CCT January theme challenge - candles/lanterns


I knew straight away which stamp I was going to use as I only have one that fits the challenge! It's a candle stick stamp from the ClarityStamp New Design Club - the first one I got when I joined last year. (I do have some chinese lanterns, but they're not really Christmassy, or I could make candles quite easily, but I went with the stamp.) A couple of other people on the challenge have used this stamp too for the same reason.

I started by stamping on Clarity stencil card in gold pigment ink, so I could see the outline clearly, then coloured the flame and candle stick with a versa mark pen. I then heat embossed with gold, giving a solid fill for the flame and stick, with the candle left white.


Candle image embossed in gold

I painted the candle with peacock feathers distress ink, and stamped a few sparkles in the background with the gold pigment ink.

I cut an oval frame from gold card, then cut the candle image to fit behind it. The base of the candle stick nested nicely onto the frame. I used foam pads to lift the frame above the image.

For the background I started with card a similar colour to the peacock feathers distress ink. Having admired an embossed background on another card in last week's challenge, I wanted to use one myself this week. I'd had an embossing folder in mind, but then thought to use the snowflake stencils from Clarity (another Christmas present).

I covered them in the gold pigment ink before embossing, then ran them through the Grand Calibur.


Turquoise background with snowflakes stencils


I repeated to fill in the last corner, then added gold mica powder, which clung to the pigment ink on the snowflakes. I love this effect, and the combination of the turquoise and gold.


Turquoise background with gold mica snowflakes


At this point I had a "learning experience". I thought I'd blend a little peacock feather distress ink round the edge of the background to edge it and tie in with the candle. However, when I did this, I wiped off the mica powder from the edge! Oops. Next time I'll know, colour the edges first. So I had to go over the snowflakes with versa mark end and add the mica again.

I had thought about adding a sentiment, but I like the background so much I don't want to cover more of it. I just added thin strip of the gold card as a ribbon, mounting that and the candle on foam pads, and more gold card as a matt behind (I meant to cut something out of the centre first to be frugal, but forgot!) then mounted on a 5x7 card base.


Christmas card in turquoise and gold with candle and snowflake background

Christmas card in turquoise and gold with candle and snowflake background


I wasn't sure how this would turn out, the image isn't one I'm particularly drawn to, but I do quite like the simplicity of it used like this, and the colour. But it's the background that really makes this card for me. It isn't exactly what I had intended, but I think it looks gorgeously rich and opulent.

Thursday, 21 January 2016

Orange? Really?

Well, 52 Christmas Card Throwdown have really done it this week. The colour challenge is orange!

52 CCT January colour challenge - orange


Thank goodness for the design team inspiration, as I was completely stumped - Christmas just isn't orange, is it? Don't get me wrong, I love the colour, but it's sunny or Autumnal, not Wintery or festive, to me.

Orange Christmas card with snowflakes and Merry Christmas die cut


Turns out this was a really fun challenge, as I had to start something without really knowing how it would end up.

I decided to have a session making backgrounds in orange, and see where that went.

I started with clingfilm backgrounds. I used Stamps Away stamp and colour card, a coated card, and brayered distress ink over it. I used spiced marmalade, ripe persimmon and a bit of mustard seed and fired brick.

Card brayered with orange inks


Then sprayed a length of cling film with water and placed it over, crumpling it a little. I had quite the production line going.

Orange cling film backgrounds drying on the fish tank


The top of the fish tank is great for drying things, as it's nice and warm. Both tanks were covered!

I also tried a few salt backgrounds. I used watercolour card for these, then spritzed them directly with water and sprinkled salt onto them. Worked out quickly that these don't go on the fish tank - they need to dry naturally to work. Rub off the salt once dry to reveal the dappled pattern.

Salt backgrounds in a range of oranges


So now I have a great set for my stash, but which to use? After playing around a bit, I went for one of the salt backgrounds, cut down to just under A6 size. But I wanted to add more to the pattern, so I got out the Clarity snowflake stamps I got for Christmas. I stamped in watermark ink, then added micaboss and heated with a heat gun. I then added white mica powder.

Orange salt background with snowflakes in white mica powder


The snowflakes aren't perfect as the salty card doesn't take the stamp very well, but for a background they're pretty.

It still needed more texture though, so I stamped again using spiced marmalade distress ink. Far too dark! I tried adding more white mica to tone it down, and really liked the effect.

Orange salt background with snowflakes in ink and white mica powder


If you look at the right angle the ink snowflakes shimmer like the mica boss ones.

Orange salt background with snowflakes in ink and white mica powder


That's a very pretty orange background made! Now how to make a card with it?

I pulled out another Christmas present, a Merry Christmas Tattered Lace die, and some Tattered Lace snowflake dies. I cut them in silver Centura Pearl card, and laid them over the background.

Originally I'd planned to use the mica boss, ink stamps and die cuts as separate effects on different cards, but it turns out that in this case less is not more, and the different textures all together work beautifully.

I edged the background in spiced marmalade, then with brushed corduroy to tone it down to more of a burnt orange. A Centura Pearl layer underneath, edged in orange sharpie and brushed corduroy, forms a frame and mount for the orange layer, and it all goes onto a 5 x 7 card.

Orange Christmas card with snowflakes and Merry Christmas die cut

Orange Christmas card with snowflakes and Merry Christmas die cut


I love the result, and I have been convinced that orange can be Christmassy. In addition, I have a lot of background papers for other projects - I already have plans for some of them.

I also really like my new die. I think this is one to cut several times in different colours and finishes, and have ready to use as it'll work on so many different cards.

Thursday, 14 January 2016

The first card of the year

Happy New Year!

It's the first 52 Christmas Card Throwdown challenge of 2016, a sketch challenge.

52CC Sketch


I've had a difficult week, and been away a lot, but I didn't want to miss the first card of the year, so I fell back on my stash of Christmas papers and some dies for a simple make.

Christmas card with holly wreath, bird and Noel tag


The wreath is a spellbinders die; I cut it twice to try different patterns. The one I didn't like was a double sided paper, and serendipitously the brown reverse works well as a "shadow" effect under the green wreath, to make it stand out from the background.

The bird is a Tattered Lace die; it comes with a flowery wreath, but I hope that by cutting it in a red pattern and pairing it with the holly wreath it suggests a robin, or at least has a Christmassy feel.

The tag I made as I couldn't find a sentiment that fitted. I designed a page of Christmas sentiments in different fonts and colours, in Word, and printed it out on card.

Printed sheet of Christmas sentiments


I cut the Noel out with a small tag die, and coloured it with antique linen distress ink, then edged it with vintage photo. The rest will go into the stash for now. I also edged the backing paper with vintage photo distress ink.

I used a small piece of string to "attach" the tag, and used foam pads to mount the tag, wreath and bird for dimension.

It all went onto a 5x7 card base.

So there you have it, my first Christmas card of 2016. Approximately 9 months earlier than I've ever managed before!

Christmas card with holly wreath, bird and Noel tag


Friday, 25 December 2015

Feeling Autumnal

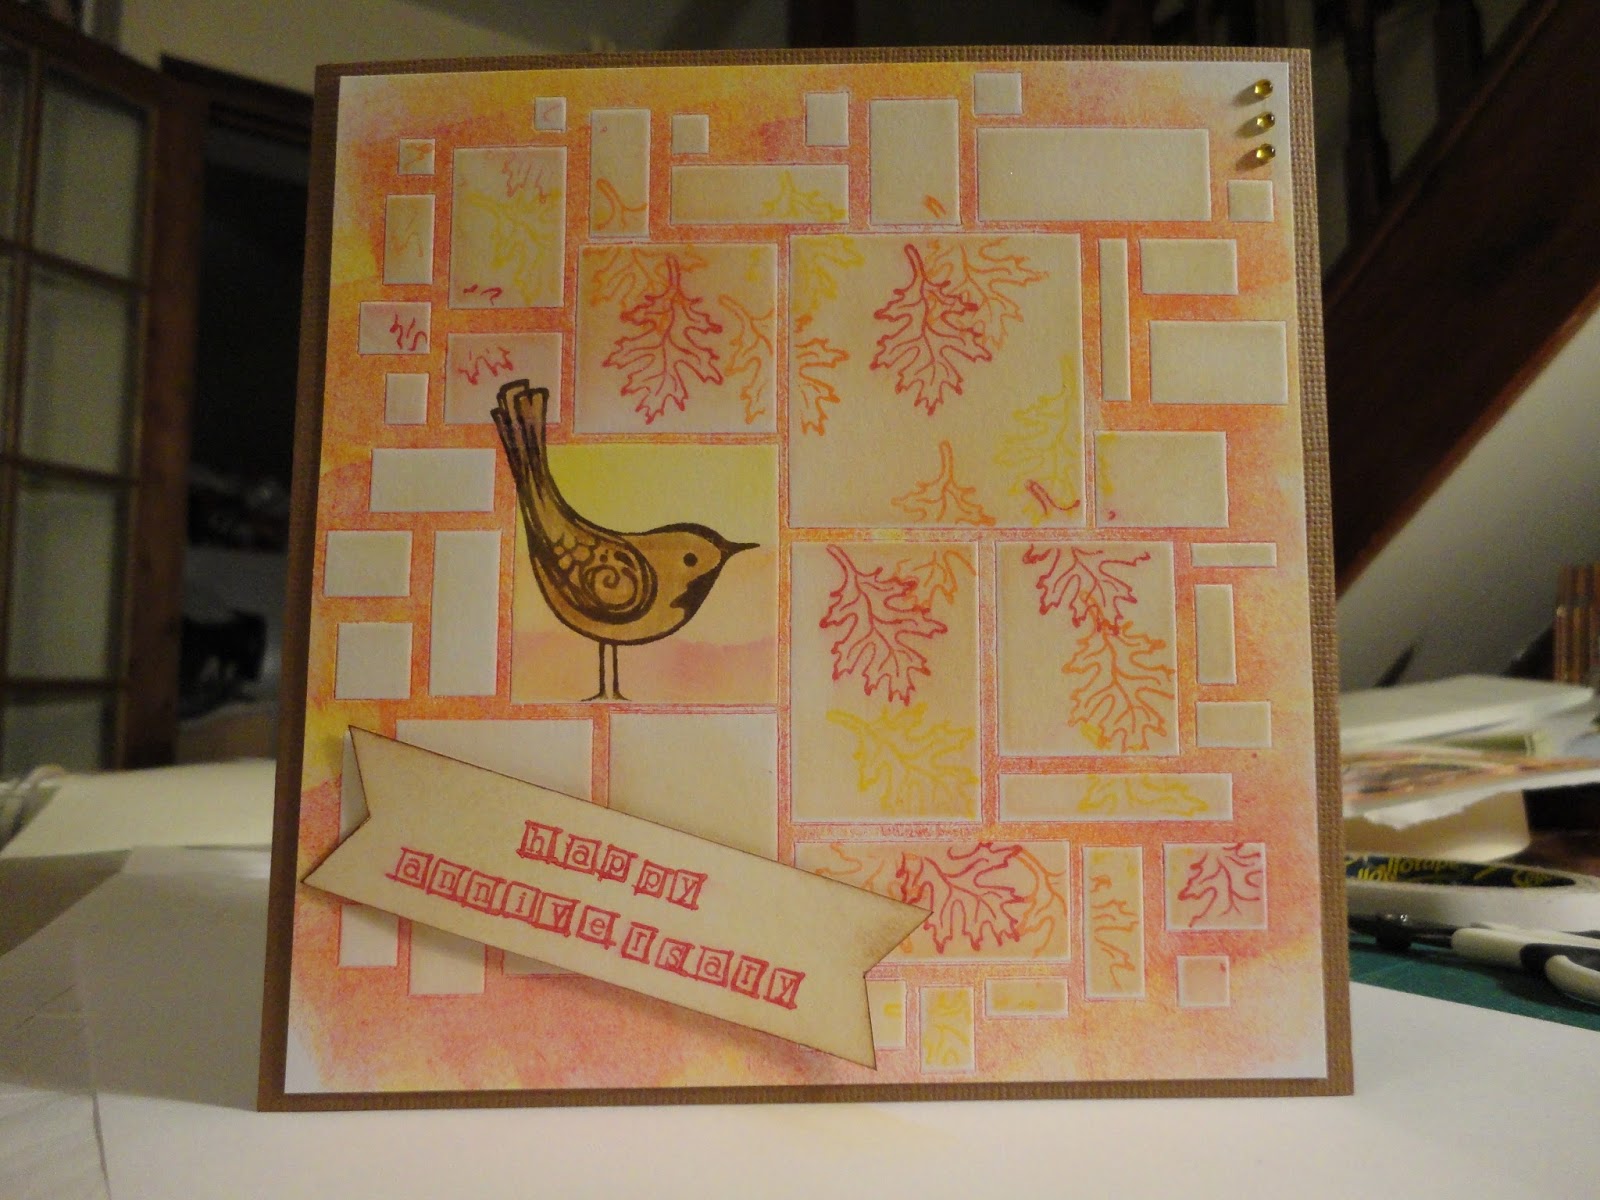
Autumnal anniversary card with bird and leaves


This is a card I made back in October, when the trees were turning red and we were having glorious warm autumnal days. It was for my parents' wedding anniversary, so didn't need to be blogged for a deadline - hence the delay in posting it here! I did send them the original on time.

I was thinking about stencils as that was the theme for the ClarityStamp challenge for the month. So I got out the abstract squares Clarity stencil.

I inked all over it with yellow, orange and red pigment inks. I did this over a sheet of stencil card, so I got this gorgeous waste, which I can use in another project.


Stencilled image - squares in autumnal colours


I then taped the inky stencil to another sheet of card and ran it through the Grand Calibur to transfer the ink. I didn't remember to get a photo at this stage!


Cascading leaves stamped through stencil


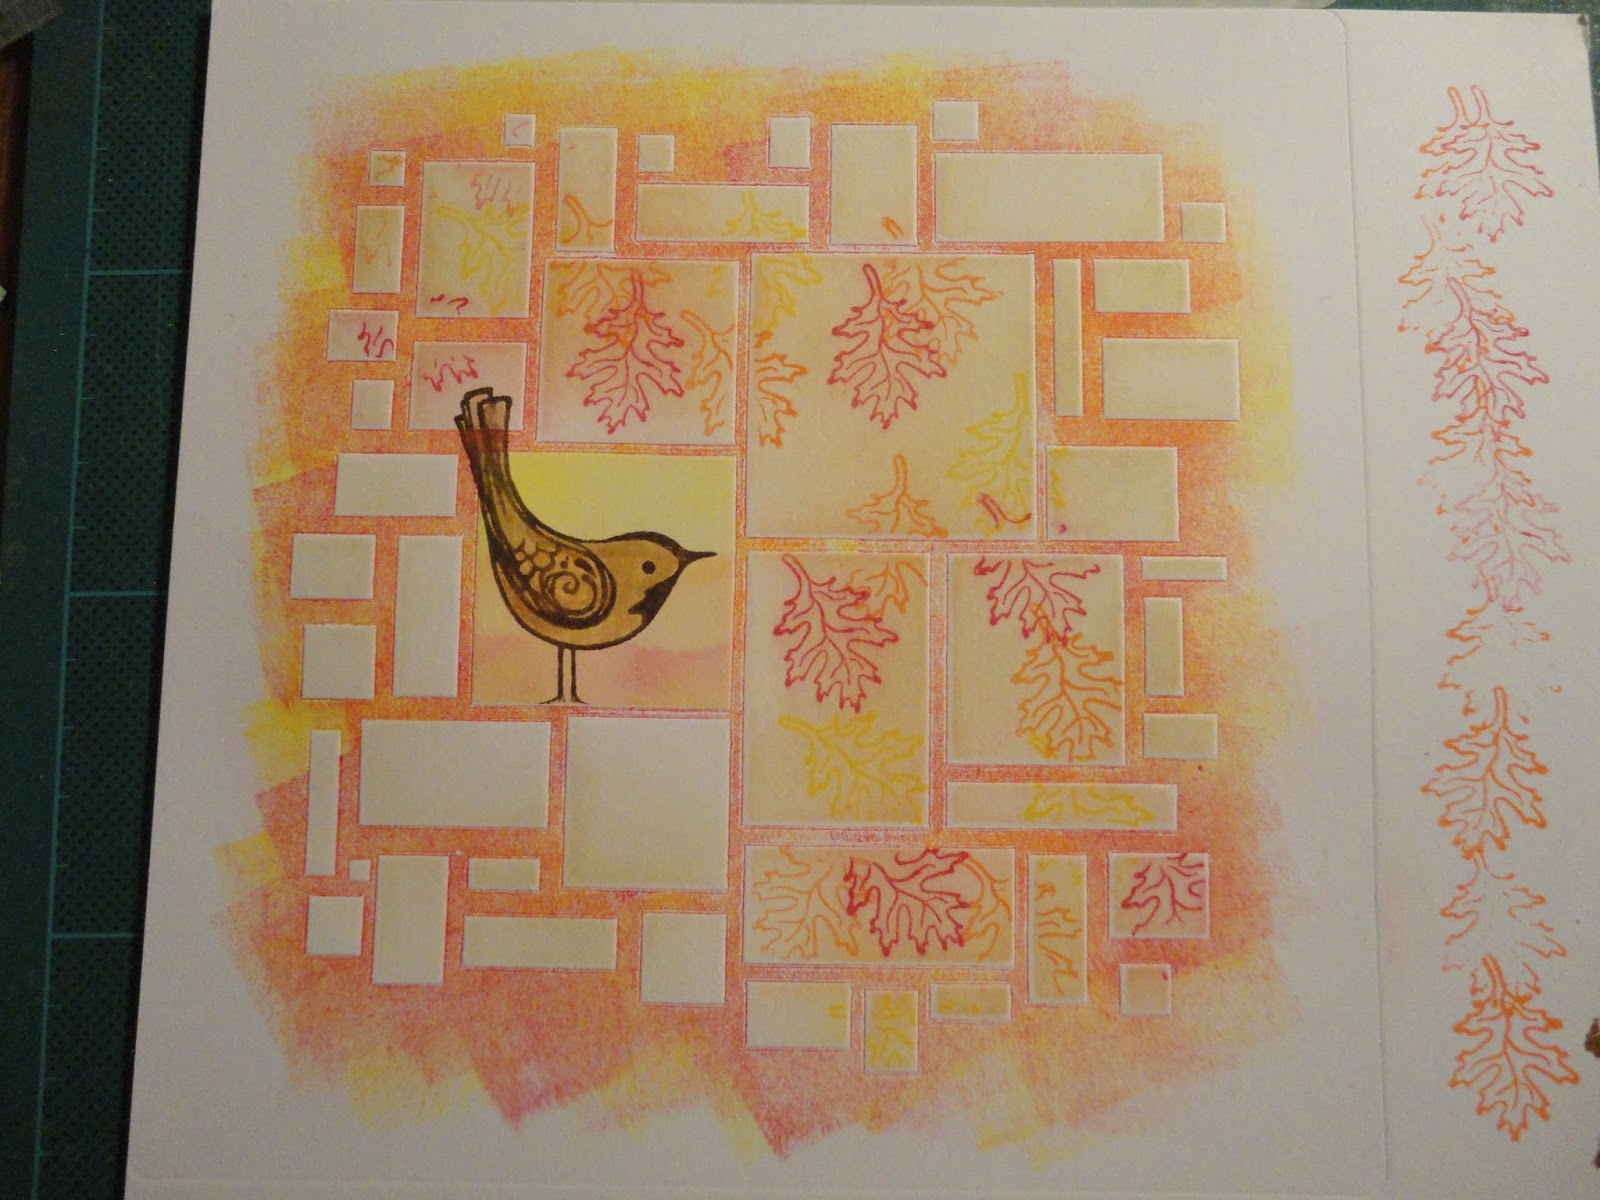
I blended antique linen distress ink through the stencil into the squares, leaving one big square white. I then stamped leaves in the same autumnal colours as I'd used for the frame, in a cascade across the card.


Stencil print with cascading leaves


Turning to the empty square, I masked it off and added a yellow "sky" and orange hills, then stamped a bird image sitting on the frame, in walnut stain distress ink. This is from a hobby art stamp, birds on a wire; I just used one of the birds and masked the wire.

I used vintage photo distress ink as a paint to colour it in.


Stencil print with bird and cascading leaves

At this point I realised I should have started with the bird and masked it, as the frame is going through its tail. And the pigment ink doesn't lift off with water. I ended up using a white pen to go over the tail, then repainted the lines in. I think I got away with it!


Stamped bird image


Looks fine from this distance!


Stencil print with bird and cascading leaves


Next for the sentiment banner. I blended antique linen onto a piece of card, then stamped in red using an alphabet stamp set I got at my local arts and crafts shop.


Ink pads, blending tool and alphabet stamps


Then I realised the card was't wide enough and had to do it again along the length!

Happy Anniversary sentiment in red


I cut the sentiment into a banner shape, and edged it with vintage photo ink. I mounted it across the corner on foam pads.


Autumnal anniversary card with bird and leaves


I finished it off with a brown frame and card base, and a few gems on the top corner.


A warm autumnal card, although with different colours this could be adapted for any season - add a red chest and you've got a Christmas robin!