Saturday, 31 October 2015
Clarity Challenge for October '15 - Stencils
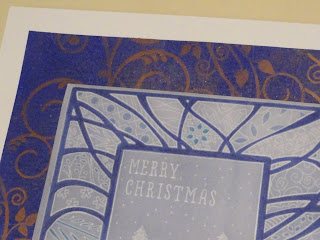
Here is my entry for the ClarityStamp October challenge. The theme is stencils.
This was a slightly tricky one for me, as I only have 3 Clarity stencils (although as I took advantage of the offer on stencils this month, several more have just arrived and are ready to go under the Christmas tree for me). I've been pondering all month what to do, and have used stencils on other projects (including an anniversary card for my parents which I'll blog when I get a moment) but they all used non Clarity elements so couldn't be entered for the challenge.
Finally, watching the Groovi shows on Hochanda this week gave me the itch to use my Groovi plates, so I've combined those with the stencil for this card.
I started with the Flare Frame stencil, and used it as a template to emboss a piece of parchment, using the soft side of the mat. This was the trickiest part, getting the pressure right to give a clean line without puncturing the parchment. I used 3 Groovi plates or borders at a time to hold the stencil down and prevent it flexing.
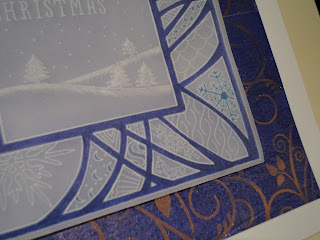
Next was the fun part. I filled each of the spaces I'd created with different patterns from my Groovi plates, borders and the Groovi mate. As I wanted to make a Christmas card (I have a lot to do still this year) I used a lot of snowflakes, as well as the Christmas border, but also took patterns from just about all of the plates I have. I really liked this part, searching out interesting shapes and patterns, it's something I'll do again.
For the centre section, I used the bunting wave and alphabet border to write the greeting, then used the landscape plate from the starter kit and the trees from the Christmas border to make a simple scene. I used the dots from the basics border to add snowfall.
I left this part of the project and moved onto the background to go behind the parchment. I wanted a rich blue to make the white line art stand out. I spread cobalt blue acrylic paint on the gelli plate with my brayer, and pulled a plain print with Clarity stencil card. There were white areas remaining, so I repeated the process, brayering in the perpendicular direction. Then, to add some interest, I coated the gelli plate in paint again, pressed paper towel in to leave a pattern, then printed this onto the same card.
The circular pattern is subtle but is there, and the colour is nice and intense.
To add interest and use another stencil, in keeping with the theme, I coated the leafy swirl stencil (my absolute favourite and must have) in watermark ink and embossed it onto the card with my grand calibur. I added bronze mica powder to pick up the design.
I think for this purpose, metallic pigment inks work better than watermark ink, they seem to give a stronger impression.
Back to the parchment. I wanted to pick out elements of the design to complement the backing paper, so I created an outside border to contain the design (using the straight line as the nested squares plate is still on my wish list!).
I coloured the stencil lines in a purpley blue. I used a watercolour pen as I liked the colour, but it wasn't the best choice as it didn't take to the parchment very smoothly. Fortunately, viewed from the front the parchment is quite forgiving.
I was very brave and tried a little white work in the centre panel. This is still very new to me, and I struggle with the patience needed to work slowly and gradually. I will keep working at it, as I love the effects that can be achieved.
I also picked out elements of the border in a turquoise and light blue, using sharpie pens this time, which I know work well with parchment.
I wanted to keep the colour very sparse and subtle as I like the effect of the crisp white lines and I didn't want to detract from that.
At this point I changed tack a little. I wasn't happy with how my back ground looked behind the parchment - it was too dark, and the swirl pattern didn't really show. I preferred the lighter blue on my waste paper, where I'd cleaned my brayer. That wasn't wide enough to use, so I recreated the effect as closely as I could on another piece of stencil card.
I then trimmed and scored the parchment, and cut this new background to size to make a wrap.
So this is the finished parchment work.
I didn't want to abandon the original background though, as I did like it, so I extended the leafy swirl pattern, using copper pigment ink this time, over the whole sheet. I used a versamark pen to fill in where there was an obvious edge to a part of the pattern, and added the bronze mica again.
Then it was a matter of choosing which area to use, and trimming back to a 20cm square to mount the parchment.
I mounted the whole thing on a 23cm square of white card, and my card was finished.
Post script - I'm very proud to say that this card was chosen as one of the top 5 entries for the Clarity challenge in October.
Subscribe to:
Post Comments (Atom)


Very nice love your colour your back ground great and what looks like parchment hope I'm right looks good on top good luck in the clarity challenge xx
ReplyDeleteHello, yes, it's a parchment piece on a gelli plate background, I really went all out on the Clarity techniques! Glad you like it.
Deletei like how you have combined a number of techniques to produce your lovely card! Thanks ever so much for joining in with the Clarity Challenge and best wishes! ;~}
ReplyDeleteThank you Shelagh, I had fun playing around to make it.'/
DeleteSorry for the strange characters at the end of that comment, my daughter hit the keyboard just as I hit publish!
DeleteWhat a clever idea Lucinda to combine parchment with a Gelli background. Thanks for entering the Clarity challenge this month. Good luck x
ReplyDeleteThank you Angela. It wasn't quite what I originally intended to do, but I like where it ended up.
DeleteThis comment has been removed by a blog administrator.
ReplyDelete