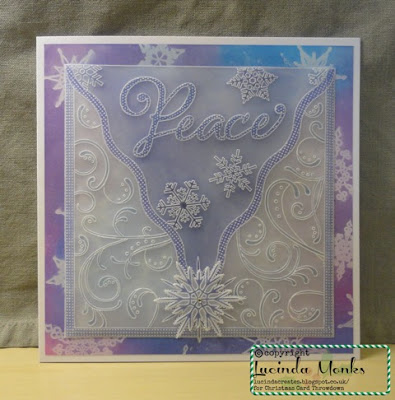
It's time for my first card as a member of the Christmas Card Throwdown design team!
We have a sketch challenge to kick us off for 2017.
I wanted to do something a bit special. I haven't used groovi for a challenge card before, so it was time for a bit of parchment.
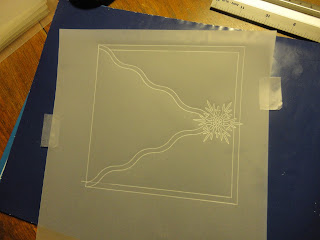
I started with a snowflake for the star part of the sketch. I think snowflakes must be my most used Christmas image! These Clarity ones are so pretty, I use the stamps a lot too.
Next I add the frame. Straight lines for the outside, and wavy for the triangle - I see this as an envelope flap, although with hindsight I think a border along the top would have looked better. Doing this after the snowflake means the snowflake can sit over the frame.
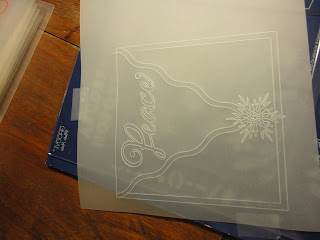
Time to start filling in the spaces I've made. A word for the focal point - this is all worked from the back, so this is the first photo showing the front of the piece.
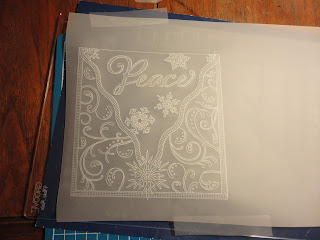
And now the really fun bit - filling in patterns. I used this floral groovi plate for the outside, but by just picking up the swirls and dots, and not embossing the flowers and leaves, it makes a more Christmassy background. It's so easy to just pick out the parts I want to use, and ignore the rest.
For the "envelope flap" I used smaller snowflakes around the word.
Finally, to make the word and borders stand out, I used the piercing grids to emboss a dotty pattern. I did all the dots, rather then trying for a fancy pattern in the border!
With all the embossing done, I add some colour. I used faber castell polychrome pencils, and then when I wanted more colours, distress markers as well.
This is what it looks like from the back - the colours are a lot more vibrant (you colour on the back so see them through the parchment on the front). It may not show well in the photo, but this also means you don't have to be too accurate - it's very forgiving if you go onto the lines.
To make the triangle stand out more, I brushed distress ink over the back. This is salty ocean and chipped sapphire.
For the background, I used the matching snowflake stamps from Clarity. I stamped in versa mark onto coated card, then blended distress ink over the top, giving a resist. The colours are salty ocean, chipped sapphire, picked raspberry and dusty concord.
To construct, I cut the parchment back to the border with a knife, cutting round the snowflake that peeked over the bottom. I also cut the background to fit a 7x7 card (keeping the rest for another day). I attached the parchment with super sticky tape under the coloured areas, then the background with a tape pen.
Edit: I forgot to say, I attached a plain piece of parchment behind the decorated piece, to increase the opacity so the background didn't overwhelm the design.
For a final touch, I embossed the large snowflake onto an off cut of parchment and coloured it to match the one on the card. I then pierced around the outside, and picot cut it out. I attached it above the base one, but offset, with a clear foam pad so it's raised a little. A tiny gem in the middle finishes it off.
I didn't do that much groovi work last year. I think I got caught up in the white work, which is beautiful but time consuming, so not always practical when you need a last minute card.
But as this shows, you can make a beautiful piece without whitework, and I love combining parchment and other techniques. So I'm going to try to play with my groovi stash more this year - watch this space!


What a beautiful example of the Groovi plates! Lovely card!
ReplyDeleteThank you Irene. I had a lot of fun making it.
DeleteJust beautiful, Lucinda! I really love how you have combined the stunning parchment design with the inked background. Welcome to the Design Team! April x
ReplyDeleteThanks April. It's lovely to be here!
DeleteSuch a stunning card, Lucinda :-))
ReplyDeleteI am happy that you on board, too. Hugs, Andreja
Thanks Andreja. Looking forward to a great year of beautiful cards x
Deleteta carte est superbe et très originale Lucinda, c'est une merveille pour les yeux, biz
ReplyDeleteJe vous remercie Fabiola. Je voulais faire quelque chose d'un peu différent et spécial.
DeleteJust beautiful It's perfect with the purples showing through, I love those colours. I'm tempted but I'm standing firm about buying any new 'stuff' just now!
ReplyDeleteThanks Alison. I usually avoid pink, but a little flash just works here. I admire your resolve - I'm terrible for giving in when it comes to buying craft stuff!
DeleteWow what a beautiful card. I have no idea what groovi plates are but based on your card I am completely intrigued. So very cool.
ReplyDeleteThank you! Groovi plates are from ClarityStamp, and are a means to make parchment craft more accessible. There's an intro here - https://www.youtube.com/watch?v=bKiDQbTAZQg Be warned, they're addictive!!!
DeleteAbsolutly stunning! I love this vellum and the colors are amazing!
ReplyDeleteThanks Kaja. I started with blues, but the purples took over, and then the pink snuck in for a bit of drama!
DeleteThis is beautiful! I really love parchment work and the soft colours and styling is exquisite
ReplyDeleteThank you Birgit. I'm a real beginner at parchment, but I just love the effect it gives even at this basic level.
DeleteSorry to be so late in commenting on this stunning card! I've always loved parchment work, but struggle with it. Your card is beautiful, elegant and just lovely. Thanks so much for sharing all the steps too. Wonderful take on the sketch. Deborah, xx
ReplyDeleteThank you Deborah. Preachment was something I'd never have even attempted prior to the Groovi system. It does make it so much more accessible to those like me without the patience or time for the traditional method!!
Delete