It's another Clarity Challenge today.
I had such good intentions to not leave it until the last minute this month (after my "6 minutes to spare" effort last month). I did start my snipping back on the 8th, but have still had a day of it today! So posting the finished picture now, and will be back to blog properly once I've linked it up, to make sure I don't miss the deadline.
Back again!
The challenge theme is fussy cutting. So I thought it'd be the perfect opportunity to practise my parchment snipping. I had a go at the Clarity Retreat in July, and got some scissors. It's a bit of an acquired skill, but I thought even if I start out a bit ropey, I should be a lot better by the end of the challenge!
I used the leafy swirl Groovi plate. I love this design, the stencil is my favourite, so I had to get the plate when it came out, although this is the first time I've used it. The idea was to use the stencil for the background, so the two tie together.
I quickly realised that the swirls aren't the easiest way to start with the picot cutting! But, I ploughed on anyway. And I think I have got better. I figured out that when doing the piercing (around the design, with a two needle tool), working towards me is a lot easier than away, I get a smoother line.
And snipping is easier when you've got a solid sheet to work on, so doing the fiddly swirls first, then the straighter bits, is best. The actual picot varies, some is alright, other bits are a bit ropey, and I'm not always sure why - I think I'm doing the same but the results say otherwise! Practise, practise, practise.
But despite this, I think the results are very pretty.
You'll spot the butterfly there as well. This is a Clarity Club stamp. I heat embossed it in white onto parchment, and picot cut it out. There is a Groovi butterfly, but I don't have it.
So, that was the time consuming part of the project. I was expecting the gelli plate background to be a lot quicker. I didn't allow for the unpredictable element! I've had several goes and different approaches to this today. Some just didn't turn out as I wanted, but I also had a lot that looked great but then stuck to the plate and were ruined when I tried to pull the print. Not sure what was happening, maybe I'm using the wrong paint, maybe the plate needs a bit of tlc, maybe the paint needed to go in the fridge(!). On the up side, I have some lovely waste prints etc to use, and some partial prints - I may need to get into paper piecing to make use of them.
These are the prints I ended up using. They both started with a thin layer of yellow on one side and blue on the other, then south pacific, lifted off through the punchinella.
The top one then had a layer of cream paint, also lifted off. I put hey pesto on to lift the print, that didn't take much of the paint off, so I used the cream paint again to pull a second print, which is what I've used.
The second print had a layer of hey pesto which I laid the stencil into, and lifted paint off through the stencil and punchinella. As it dried I removed the stencil and pulled a waste print to remove the paint under the stencil, which was still wet.
This is the waste - how lovely. I have a few of these now! I might try to work them into next month's challenge, In the Garden.
I then used the cream paint to pull a print with the paint left on the gelli plate. It tore a bit, but was the best one, and I was able to cut a panel out of it to use.
I over stamped the first print with the butterfly, in Potting Soil archival ink, to add interest.
I then put it all together. Both gelli prints were trimmed, then edged in brown sharpie pen, and mounted on white stencil card with a narrow border. The small piece went onto the larger, on foam pads to lift it. I then attached the parchment using a tape pen - I use these all the time, so it's a bit of a result to find that they can be used on parchment and don't really show.
And here's the finished article again.
I'm not sure how I thought this would turn out. I had hoped for more of a stencil background, but it wasn't to be.
However, that did lead me to using the two prints together, which I like. It's all a learning curve, I had fun playing with the gelli plate, despite the frustration at times. And I'm happy with the outcome, it's delicate and pretty.
As the month draws to a close, I've finally (and not as last minute as sometimes) done my Berkhamsted Creative Challenge entry.
The theme for this month is Far Away Lands.
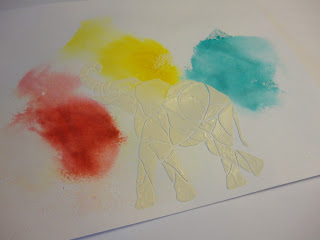
In keeping with my personal challenge to use something I've had for ages and not used before, I brought out my elephant stencil from Clarity.
I wanted to capture the feel of the holi festival, with all the clouds of coloured pigment. I started in my favourite place, messy backgrounds. For these ones, I used fired brick, mustard seed and peacock feathers distress inks. I applied them to my blending mat, then added water to them, and to some Clarity stencil card, and then pressed the card into the ink. I used varying amounts, and moved the card more or less, to get different effects.
I used the two on the left for this project, the others have gone into the stash.
My plan was to use texture paste through the stencil, to contrast with the background. But one of the backgrounds had such a gorgeous mix of colours I wanted to use them, so a second approach was born.
I did a trial run with the texture paste. I wanted to try stamping into it to give texture. I tried it a couple of times - this is the second attempt.
I wasn't happy with it, so gave up and didn't stamp into my "real" elephant.
However, when I came to try out the gilding waxes on my scrap piece, the pattern really came to life.
So I wish I had persevered with the stamping. One for another time!
For now, I added the gilding waxes - mainly gold but with touches of green, red, bronze and silver in different areas.
To add the texture that I wanted, I stamped with archival ink, in potting soil.
I also wanted to add more texture to the background, so I used the same stamp (a swirly corner from a Japanese set from Clarity) to over stamp the coloured "clouds". I used second generation stamping so it was subtle.
I also added a bit of shadow under the elephants feet, to ground her, using faber castle polychromos pencils.
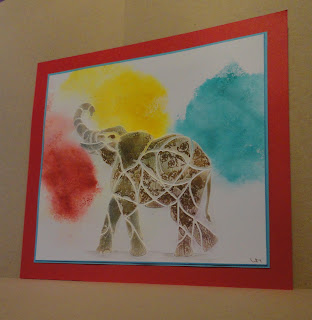 To finish off, I trimmed back the image and edged it with a blue sharpie pen. I mounted on blue, with a narrow border, then red. I used my perfect layers rulers to cut the mounts.
For my second background, I applied versamark ink through the stencil, with a make up sponge, then heat embossed in clear powder.
Unfortunately, my versa mark isn't as clean as it could be, so the colours have been dimmed a little.
To make the elephant stand out, I used a makeup sponge to apply adirondack ink in slate. The heat embossed areas resisted the ink, so just the lines stood out. Originally, I very careful went round the edge to give a narrow border. However, I then realised I needed a bigger contrast with the background, so went back and added a much bigger graduated shadow.
I used a black polychromous pencil to add definition under the feet, again to ground her.
Having trimmed back the card, I felt that the bottom left corner was a bit empty. So I was brave and added more ink, again adding water to ink on the blending mat and dabbing the wetted card into it.
Once this had dried, I edged the card with a black sharpie, and mounted onto red then yellow to finish.
Two colourful elephants, ready to celebrate holi, and I hope evoking some sense of the exotic.
A theme challenge at 52 Christmas Card Throwdown this week - Gifts.
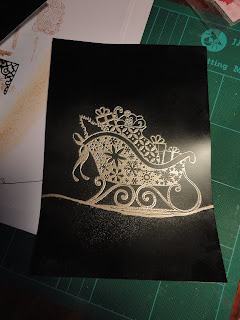
I thought I'd incorporate these with a lovely sleigh stamp I've been meaning to use for ages (personal "use something I've had for ages and not used" challenge met!). I couldn't remember exactly what it looked like, I hoped it was full of presents, but it wasn't. So I thought I'd fill it, using a tattered lace present die.
I also thought I'd use black coated card (Clarity Card) - which is very dramatic, but difficult to use, as every mark shows!
I started by stamping with versa mark and heat embossing in platinum.
I added a line for the ground, although I wasn't happy with it so changed it later.
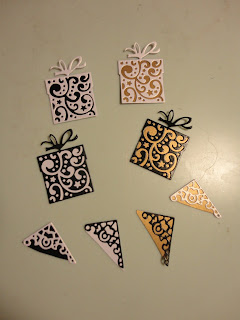
I then die cut the present, in black and in Centura Pearl hint of gold. I backed them with the opposite colour, and also in gold.
Thinking I might need a few extras, I cut out a corner die, to use for bits of presents peeping out from behind the big ones.
For the sky, I used a star cluster from Lavinia's stamps. They are in chateau mica powder (on versamark ink) which is a really good match for the platinum embossing powder.
I cut a slit in the sleigh image, along the top of the die, and arranged the presents through it. Once I was happy with the layout, I taped them in place from behind, with a bit of super sticky as well to make sure they were secure.
I cut another section of black card to go over the lower section, to hide the mess I'd made, with the ground line and finger prints etc. I stamped a sentiment from Clarity, and also edged it with a versa mark pen.
Finally, after trimming the image down (removing more fingerprints etc from the edge!) I ran the versa mark pen around the edge and heat embossed for a frame, then mounted on an A5 card base made from Centura Pearl hint of gold, to tie in with the presents.
I do like this colour combo, and I'm pleased with how the presents look in the sleigh, and the sleigh itself - the star pattern has come out beautifully. But I did battle with the glossy card - not an easy card to just knock out this one!
This week's 52 Christmas Card Throwdown Challenge is colours - red, black and kraft.
Red and black aren't my favourite combination, so I struggled a bit to come up with something I wanted to make, until I turned it around to kraft, black and red. Because kraft I really do like!
This was a quick one, started around 8pm tonight, so no progress pictures. But it's a straightforward design, just two layers of kraft, on a card base made from an A4 sheet folded in half and cut down to a square.
The stamping is all black archival ink. The main image is from a lovely Hobby Art Christmas set. And I haven't used this scene before, so a tick for the "use something I've had for ages and not used before" goal. The background pattern uses the branches of a tree from the same set.
The sentiment is from a Clarity sentiments set. The first line is "wishing you a", but I didn't ink that up so I got a simpler version.
I edged all the layers, and the card base, with a black sharpie pen.
The final element is the holly sprigs. These are an old favourite stamp, red rubber on sponge, one of the first I ever got and I've no idea where it comes from! I stamped on some scrap kraft (from a first go at the main scene that went wrong) and fussy cut them out. I then added my minimalist touch of red, for the berries. I'd planned to use embossing powder, but it sank into the card and went dark. Fortunately hubby came to the rescue, with a tin of red enamel paint. The first one ran everywhere, we think it had been diluted at some point, but the second was perfectly gloopy, and has worked beautifully to give a little pop of colour.
I put the card together with foam pads to give dimension.
Simple and classic. The scene stamp is really lovely, with the flowery swirl below it. I'd like to use this again and try colouring it. Maybe I'll make the same card but with colour instead of kraft.
It's been a few weeks since I took part in the 52 Christmas Card Throwdown Challenge - life getting in the way! And been away for a week. Although some of the themes have been ones I really wanted to do - I'll have to make the cards anyway!
This week it's a sketch challenge.
I got back yesterday so it's had to be a simple design today.
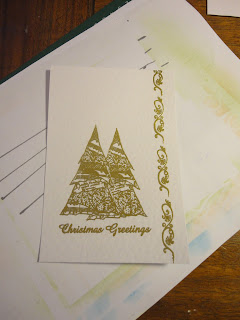
I wanted to use zeta hammered card for the texture. I wasn't sure how it would stamp, being textured, but turns out the answer is beautifully!
I used the ClarityStamp collage tree, stamped with versa mark, and heat embossed in gold.
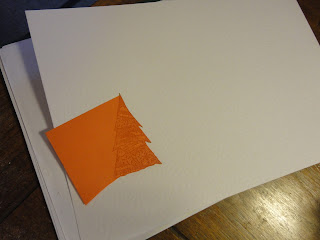
I then cut a mask from a sticky note, and stamped a second tree behind it.
For the sentiment, I used one of the Clarity Christmas Greetings stamps, newly acquired. The vertical line is a swirl that is actually from a Japanese set (also Clarity), but I think it's pretty, and generic enough to work for Christmas. Everything was gold heat embossed.
Having trimmed back to the size I wanted, I edged the outside with a versa mark pen and heat embossed in gold again. I then cut a matt to go behind from the same card (and remembered to gut it, using my Merry Christmas sentiment die) and edged this in the same way.
I used a 5x7 card base for the two layers.
A simple and quite literal take on the sketch, but I think the white and gold, and the hammered card, give an elegant look.


