Sunday, 31 July 2016
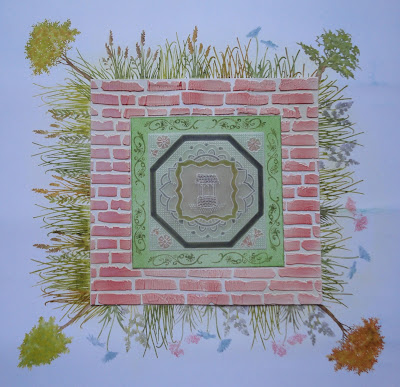
A Day Out in a Walled Garden
Here's my very last minute Clarity Challenge entry.
Edit: And here's the finished version, that didn't quite get done for the challenge deadline - see details at the end of the post.
I posted this with 6 minutes to spare - a record even for me! I had decided that I would miss this month, I just didn't have time, but at 5pm hubby says, if I take Bethany for three hours, why don't you do it? Three hours isn't enough for what I want to do say I. But I gave it a good shot anyway! Some speed crafting has occurred here tonight. I got most of it done, a few finishing touches missing, which I'll do and blog here anyway. You don't want to see the state of the dining room table now!
The theme is "A Day Out". This had me stumped, but the design team inspiration helped out, and then I was chatting to my mum about two days out she'd had, to Athelhampton and Mottisfont, which both had walled gardens. Bing! An idea! Using the brickwork stencil, which I got in June and has fast become a staple.
There are four elements to this piece.
The first is the wall. This is on stencil card. I brushed on antique linen distress ink, then masked the centre square with copy paper cut to size. Then I dragged grunge paste through the stencil - the first time I've used this outside a workshop! Once it had dried (if I'm honest, a little before!) I replaced the stencil (thoroughly cleaned) and brushed fired brick ink through it to stain the textured bricks.
The outside of the wall is meant to represent a wild meadow, and to contrast with the formal garden within.
I started by brushing over tumbled glass for the sky, with a touch of salty ocean, then crushed olive round the centre. The stamps used were the wee grasses, and some trees for the corners. I particularly like the tree from the Daydreamer stamp (top right) used without the bottom part of the image.
Instead of using ink pads, I tried the distress markers applied to the stamps, which worked brilliantly. It allowed me to mix up the colours really easily, rather than stamping a flat image. Definitely something I'll do again. I think I got a better stamp than with the pads as well - distress ink not being designed for stamping it doesn't always give a great result.
The third element is the "lawn" inside the wall. This was simply a square of stencil card brushed with mowed lawn distress ink. A nice dark edge built up as I brushed, which I like. I then stamped a swirl from the Japanese stamp set, eight times round the edge. I like the formal feel of this, I think it fits. I added a bit of vintage photo ink to the middle later, as it was a bit too bright behind the parchment when I tried it.
Finally there's a groovi section in the centre. I thought that the crisp lines and precision of groovi/parchment would work well to suggest a structured, clipped layout. The wishing well in the centre is perhaps less appropriate, but when I saw it while going through my plates, I couldn't resist, it's so cute. And I did want a focal point.
I used a mixture of nested plates to divide up the area, then picked out flowers for the corners, and used parts of flowers from the henna border. The piercing plates, used to emboss, are great for filling in space. And the shading under the well I'm particularly pleased with!
No time for white work, so I coloured with distress markers, picking up the same colours as the meadow.
Then I layered up! The dark green band on the parchment allowed me to use small pieces of super sticky tape, then I used a tape pen for the other layers.
To finish off, I'll trim it down and edge it, and I want to try adding some small dragonflies and butterflies to the meadow, cut from parchment using punches.
Edit: It took a few days but I have now finished this. I brought the blue sky closer into the "meadow", and added some birds in flight, and the dragonflies and butterflies. I embossed them on the soft side of the mat, punched out the shape, then coloured with distress markers on the back. I think they're very pretty. I attached them with foam pads for height.
I cut the whole back to 28cm square, and edged with a blue sharpie.
To mount, I painted the edge of a 12x12 canvas board with Hey Pesto paint, and attached the card to this.
Much more finished looking - and oops, haven't signed it yet! It's not perfect but I like this - something I'll enjoy having on my wall.
Saturday, 30 July 2016
Baubles
It's been a while since I posted - lots going on! Not least, I spent a very enjoyable few days at the Clarity Retreat, my first time going. Such fun, and learnt a lot too.
So I'm a little delayed in posting my entry for the Berkhamsted Creative Challenge this month - I did have these ready to go a few days ago.
The theme is "Circles".
I posted this teaser photo mid month:
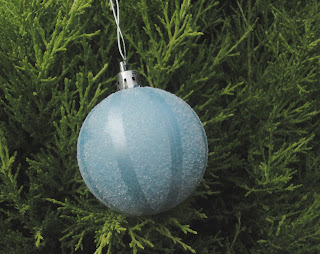
Know what they are? This might help:
I bought a set of 12 of these in a cheapy junk shop years ago, and I'd never got round to doing anything with them. So this is a big tick for my personal "use something that's been hanging around unused for ages" challenge. I'd removed the hanging bit and painted them with gesso for the teaser photo, and had them drying on kebab sticks.
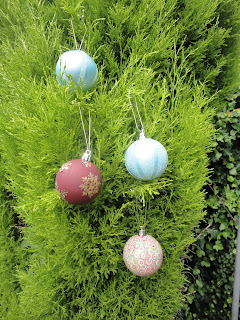
I haven't done all of them yet, I have lots of different ideas to try - and need to test if they will withstand a heat gun without melting. But here are the four I have finished.
This one I decoupaged with a Christmas paper I've also had for ages without using.
Here I started with a couple of layers of pearl paint, then masked off strips with a narrow masking tape. I painted over with PVA, removed the tape and sprinkled a white glitter over. I used cheap hairspray to seal it.
This is a mirror mage of the one above - I started by painting it as before, then added strips of super sticky tape instead of the masking tape. I added the same glitter and hairspray varnish.
This one was painted with claret fresco chalk acrylic paint. It's translucent, so needed three coats, but is such a glorious colour.
I then stuck some scraps of adhesive sheet to copy paper, and applied gilding flakes to it. I die cut snowflakes, using the smaller Tattered Lace snowflake dies, and glued them to the bauble. I used PVA, but next time I think I'd use a thin adhesive sheet on the back before die cutting, as it was a bit messy.
So four new baubles to go into the Christmas decs box, eight more to play with before December.
Friday, 15 July 2016
Feeling blue
It's a colour challenge at 52 Christmas Card Throwdown this week - shades of blue, white and silver.
My card is based on a canvas that Kay from IndigoBlu demonstrated on Hochanda not long ago. It was so pretty! It wasn't Christmassy, so I've replaced roses with snowflakes, and I've simplified it a lot for a smaller card, but the basic idea is there.
I started by dry brushing my card with blue acrylic paints. They ranged from a dark marine to a pearl ice blue, which gave a lovely shimmer.
My first attempt was very heavy handed, and not that dry, so I had another bash.
Much better, more delicate. But the first one won't go to waste.
I then stamped a strip of snowflakes (using the Clarity snowflake set) across the middle of the card. I used gesso at first, following Kay's demonstration.
This was more subtle than I wanted - maybe due to using card, maybe a different brand of gesso, maybe technique! So I added another layer using versa mark and white embossing powder.
Better!
For the sentiment, I started by stamping in white pigment ink on plain stencil card, using the snowflakes again.
This gave a bit of subtle interest in the background.
This was meant to be how I met my stash challenge - I used stazon white ink the first time, which I got ages ago in a charity shop. But the solvent in the ink picked up the indexing, or old ink, from the stamps, however much I cleaned them, so it gave a dirty finish. So I think I've failed that challenge this week.
I stamped the three words from a "Let It Snow" Clarity stamp, but masked them to separate them out. I used versa mark, then heat embossed with a navy Wow powder.
I cut out each word separately, and edged each one with a blue sharpie. I then went back and added faux stitching with a faded jeans distress marker.
Going back to my painted card, I used the two narrow strips I'd practised on, and die cut snowflakes using Tattered Lace dies.
How ridiculously pretty are these? I have loads of the card left so will be cutting more to use elsewhere.
As they don't stand out from the background that much (being the same pattern!) I cut more snowflakes from hint of silver Centura Pearl card, and used them as a drop shadow behind.
I created a matt for the card, by painting another piece of stencil card with one of the paints I'd used originally (cobalt blue), then brushed the pearl ice blue over it.
I edged the background piece with a navy sharpie, to give it definition, and added some spots of white acrylic, deliberately messy, for more interest.
The die cut snowflakes went behind the sentiment words, to form a bit of a frame for them. These were attached with foam pads for dimension. I mounted the whole onto a 5x7 card base.
There are things I'd do differently if making this again - I'd try and make the die cut snowflakes stand out a bit more, and Kay used a lovely technique of stamping with the corner of an acrylic block, which I forgot about until writing this up!
But the overall effect is very pretty and delicate, I'm pleased with how it looks.
Tuesday, 5 July 2016
Clean and simple Christmas sketch
It's a sketch week at the 52 Christmas Card Throwdown.
My idea for this one is a CAS (clean and simple) design, just using a tree stamp, sentiment and some ink. I've done a few versions - easy to do when it's so simple!
The first couple have a free form ink background forming the circle. I used chipped sapphire and salty ocean distress inks for the sky, and mowed lawn and bundled sage for the ground.
I then simply stamped a Hobby Art tree and ClarityStamp Noel in black archival ink. I don't think I've used the tree before, so have achieved my personal "something unused from my stash" challenge. I haven't used the Noel before either, but only got that last month so doesn't really count!
I worked straight onto the card bases to emphasise the simplicity.
This was the first try...
.. and this is the second.
I also tried a slightly "fancier" version.
Instead of the messy inky background, I die cut a circle from copy paper as a mask (none of my circle stencils were the right size), stamped snowflakes in versa mark, then added the ink with a blending tool. I used the same colours as above.
This gave a much neater circle for my background. I went straight onto the card base again.
I then stamped, using black pigment ink this time, and heat embossed with clear powder to give a glossy finish.
I really don't know which I prefer! I think probably the first one, for the composition, it seems to work best to me. So that's the one I'll enter into the challenge.
Given these are so easy, you could sit and make a whole set of them in a sitting - the only hold up is waiting for the background to dry. My Christmas card stash is looking pretty healthy this year, but if I get requests for more, this might be what I end up doing! They'd also look cute as tags.
Friday, 1 July 2016
Triple Stamped Christmas Jumper
The final 52 Christmas Card Throwdown challenge for June is triple stamping, with brads.
I haven't tried triple stamping before, so good to do something new.
The obvious stamps to use were snowflakes or holly - but neither helped my personal stash challenge - to use something I've had for ages but not used.
Then I realised I could use my Christmas jumper stamp set, from Clarity. This is one I coveted for ages, as a stamper and a knitter it was a must have. I finally bought it, but still hadn't used it.
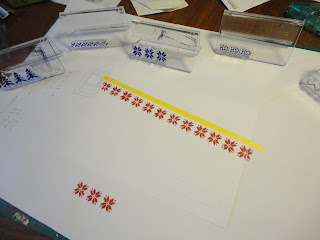
After measuring up the stamps and working out what size card to use, I cut my three layers from stencil card, and attached them using repositionable tape.
I put a strip of masking tape across, as a guide for the stamping.
The first row of stamping is this star pattern. I used fired brick distress ink.
I then added rows, building up a wide stripe across the card.
Next I made the topper. I used the jumper stamp for this, with its mask.
First I decorated the main body section, using this for the sentiment.
I then swapped the masks around and patterned the sleeves.
Finally, I used a matching distress marker to add the ribbing to the cuffs, next and waist.
I trimmed this back, then cut the matts for each of the layers. I used my perfect layers rulers, using the 1/8 inch side.
I started to layer it all together onto an A5 card base, then realised I still had to add the brads, so had to take it off the card.
There was a little red smudge above the jumper, so guess where I put my first brad!
Once it was all together, it felt like something was missing, so I got out my bakers twine, in red, white and green. I tied a double bow, and fastened it across the bottom of the card, using super sticky tape to hold it.
I think if I was doing it again, I'd angle the patterned stripe the other way, and might use more colours - green as well maybe. But I definitely like my jumper stamp, and it was easier to use than it looked.
Subscribe to:
Posts (Atom)
