Friday, 25 December 2015
Feeling Autumnal
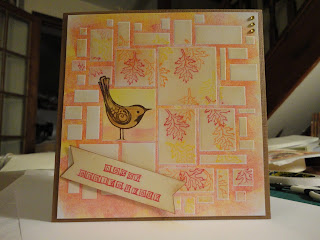
This is a card I made back in October, when the trees were turning red and we were having glorious warm autumnal days. It was for my parents' wedding anniversary, so didn't need to be blogged for a deadline - hence the delay in posting it here! I did send them the original on time.
I was thinking about stencils as that was the theme for the ClarityStamp challenge for the month. So I got out the abstract squares Clarity stencil.
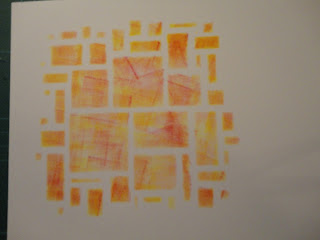
I inked all over it with yellow, orange and red pigment inks. I did this over a sheet of stencil card, so I got this gorgeous waste, which I can use in another project.
I then taped the inky stencil to another sheet of card and ran it through the Grand Calibur to transfer the ink. I didn't remember to get a photo at this stage!
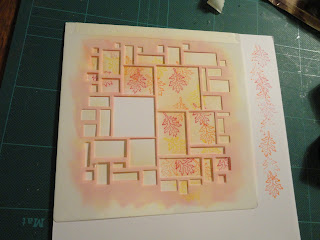
I blended antique linen distress ink through the stencil into the squares, leaving one big square white. I then stamped leaves in the same autumnal colours as I'd used for the frame, in a cascade across the card.
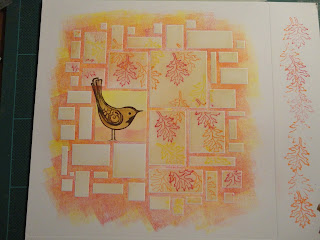
Turning to the empty square, I masked it off and added a yellow "sky" and orange hills, then stamped a bird image sitting on the frame, in walnut stain distress ink. This is from a hobby art stamp, birds on a wire; I just used one of the birds and masked the wire.
I used vintage photo distress ink as a paint to colour it in.
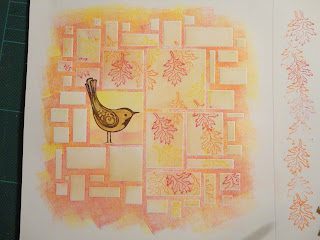
At this point I realised I should have started with the bird and masked it, as the frame is going through its tail. And the pigment ink doesn't lift off with water. I ended up using a white pen to go over the tail, then repainted the lines in. I think I got away with it!
Looks fine from this distance!
Next for the sentiment banner. I blended antique linen onto a piece of card, then stamped in red using an alphabet stamp set I got at my local arts and crafts shop.
Then I realised the card was't wide enough and had to do it again along the length!
I cut the sentiment into a banner shape, and edged it with vintage photo ink. I mounted it across the corner on foam pads.
I finished it off with a brown frame and card base, and a few gems on the top corner.
A warm autumnal card, although with different colours this could be adapted for any season - add a red chest and you've got a Christmas robin!
A Christmas Assortment
Last week saw a last minute flurry of Christmas card making, and completing some that had been "in progress" since the summer, to get them sent out to family and friends.
So here's a quick tour of the final makes of the year; some familiar faces and some new designs.
The green and purple backgrounds from November were revisited with squiggly free hand frames.
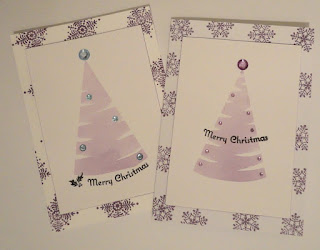
I had a play with a different shape watercolour background.
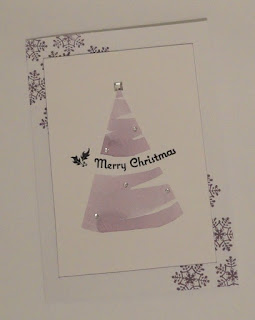
I tried stamping the sentiment before and after painting the tree, and for some stamped it over the tree.
Having used distress inks in crushed olive and dusty concord, I could stamp the card bases in the same colour snowflakes to match, to create frames and backgrounds. After doing a few I decided that second and third generation stamping looked best, and matched the colours most closely.
I used gems as stars and baubles on the trees, and mounted them up, and there's a nice batch of cards ready.
The next card is a version of the previous post, but instead of the frame I stamped some doodle shapes from a set of circular stamps I got in a charity shop, and coloured them in red to match the script. I think I prefer this version to the original!
Finally, some Groovi parchment cards. I created most of the parchment work while I was away on holiday in August, they've been waiting to be mounted. I used patterned paper from a gorgeous bundle in my stash that I bought from a local charity shop a few months ago. They quite often get a lot of craft things in, so it's always worth checking the window. These papers are quite shiny which doesn't work a lot of the time, but they look great behind the parchment.
I am really pleased with these, the parchment work is so pretty and has a lovely wintery feel. I'll definitely be making more for next year. I like the colouring, and feel confident doing it, but the white work (as on the Noel card) gives such a gorgeous effect I think it'll be worth the effort to practice and get better.
Wishing you a very Merry Christmas!
Thursday, 17 December 2015
Merry Christmas in red and green
Despite starting earlier than normal this year, I'm still having a last minute scramble to get Christmas cards made and sent out. So I'm making in bulk - lots of versions of the same card - and revisiting designs I've already made and can repeat quickly.
This card is an original, although it uses a similar background to this card from earlier in the year, so I thought I'd enter it for the last 52 Christmas Card Throwdown challenge of the year.
It's pick a previous challenge, so as I had already decided on the card I went back to see which ones it fitted. I found a colour and a theme challenge this would work for.


I started by stamping the Merry Christmas ribbon stamp from Clarity in black pigment ink onto stencil card, then heat embossed it with clear powder. I also did a version in archival ink to see how that worked.
I used fine liner in dark red to colour in the stripes along the ribbon. The embossed line made to easy to stay in the lines.
The frame is drawn in black fine liner, I measured a 2mm gap, 2mm from the card edge. I used a ruler; I had experimented with freehand drawing for a doodle-like effect, but didn't like the way it looked.
The matching stripes in the frame were a little trickier with no embossed line!
For the background, I stamped with a watermark ink using the twirly branches of my favourite tree stamp, then heat embossed with clear powder. I used pine needles distress ink over the top, wiping back to give a clear resist.
The background and topper were then attached to a 5x7 card base with a tape pen. I'm being mindful of posting, although I think I could get away with one layer of foam tape to raise the topper up. I drew round the background with the black fine liner to give it a sharper edge.
And there it is, a clean, modern card. Now to make a few more quickly, I might try reversing the colours to see how that works.
This card is an original, although it uses a similar background to this card from earlier in the year, so I thought I'd enter it for the last 52 Christmas Card Throwdown challenge of the year.
It's pick a previous challenge, so as I had already decided on the card I went back to see which ones it fitted. I found a colour and a theme challenge this would work for.


I started by stamping the Merry Christmas ribbon stamp from Clarity in black pigment ink onto stencil card, then heat embossed it with clear powder. I also did a version in archival ink to see how that worked.
I used fine liner in dark red to colour in the stripes along the ribbon. The embossed line made to easy to stay in the lines.
The frame is drawn in black fine liner, I measured a 2mm gap, 2mm from the card edge. I used a ruler; I had experimented with freehand drawing for a doodle-like effect, but didn't like the way it looked.
The matching stripes in the frame were a little trickier with no embossed line!
For the background, I stamped with a watermark ink using the twirly branches of my favourite tree stamp, then heat embossed with clear powder. I used pine needles distress ink over the top, wiping back to give a clear resist.
The background and topper were then attached to a 5x7 card base with a tape pen. I'm being mindful of posting, although I think I could get away with one layer of foam tape to raise the topper up. I drew round the background with the black fine liner to give it a sharper edge.
And there it is, a clean, modern card. Now to make a few more quickly, I might try reversing the colours to see how that works.
Friday, 4 December 2015
The back up plan
This card is inspired by one of the entries to last month's Claritystamp challenge, which I really liked - have a look here. So I've done my version. I think the term is CASEing - I saw this on another blog, it means something like "copy and share everything", or "copy another stamper's experiment".
I wanted to try it anyway, but as it uses sponging I'll enter it into the 52 Christmas Card Throwdown technique challenge as well. This was my back up in case the brayered background hadn't worked out! (See previous post.)
I started with a 14cm square of Stamps Away stamp and colour card, to fit onto a 6x6 card base.
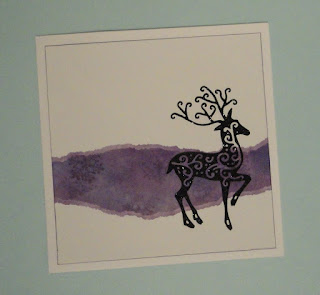
I tore masks from copier paper and fixed them into place with masking tape to leave a panel across the card. I then used make up sponges to apply distress ink; I used dusty concord, chipped sapphire and a touch of tumbled glass.
Leaving the masks in place, I stamped snowflakes into the panel, using the dusty concord. I blotted the stamp on scrap paper first, to give a more muted image.
I then moved the masks out slightly, and went back over, very gently, with dusty concord, to give a frame to the panel. I'd not seen this done before, I really like the finish it gives.
I then started to think about what focal point I wanted to use. I'd assumed it would be a sentiment, but when I went through my selection of stamps, nothing seemed to be quite right.
So I went to my stash of spare die cuts, and there on top was my black glitter reindeer from the first 52 CCT card this week. And it looked great on the panel (in my humble opinion!). I tried a few others, and got some ideas for other versions of this card that would look good, but for this panel, the reindeer won out!
So I attached it with PVA, edged the square by running the dusty concord ink pad around it, and mounted it on the card base.
Simple, but I really like it.
As I wrote this tonight, a day after making the card, I thought maybe it was a little bit plain. So I decided to add a few gems. But when I got the card out again, the snowflakes had faded into the background! I checked against the photos to make sure I wasn't imagining it! So, as well as adding the gems, I restamped the snowflakes (retrieving my torn masks from the bin!). We'll see tomorrow whether these fade as well. I hope that stamping onto dry ink will make the difference and they'll stay.
So here's the second (current?) version of the card.
Post script: 24 hours on the snowflakes are still there! Phew! So now I know, wait for the background to dry before stamping over it.
Magical Reindeer
The challenge is to use sponging or brayering.
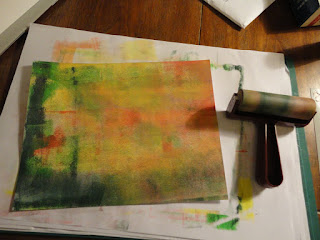
I decided to try an abstract brayered background, with acrylic paint. One of those techniques where you don't know quite how it'll turn out! A bit of a gamble maybe but I had time to redo it if needed! And as I need a lot more Christmas cards made quickly, I had a plan for another sponged card up my sleeve.
On a Clarity stencil card base, I used primary yellow, cherry red, bright green, forest green and cobalt blue paint, walking the brayer across the card.
It's also a case of knowing when to stop - although I kept going on this and it got better, softer and more luminous.
For a focal point, I used a reindeer cut with a Tattered Lace die. This is one of my favourites, I think it's very striking. I chose black glitter card, to give a dramatic contrast to the background.
I tried it on the background in different areas and orientations until I found the section I wanted to use. My circle dies weren't big enough for the piece I wanted to cut, so I fell back on my Fiskars cutting system.
The next step was is add some sponged hills to ground the reindeer and give him something to stand on. I tore copier paper to create a mask, then applied distress ink with a sponge - pine needles and aged mahogany, with touches of chipped sapphire.
To mount, I cut a larger circle from self adhesive black encapsulated glitter card. The reindeer die wouldn't cut this, it was too plastic and just stretched, but the Fiskars system, which has a blade, cut it fine.
The circle then went onto a slightly larger white square, and I edged it in black with a sharpie pen. I tried to photograph it, but the combination of white and reflective black in artificial lights was too much for my camera/photography skills!
I attached the reindeer to the brayered background with PVA, then mounted the circle into the glitter circle with foam tape.
At this point I felt that the hills looked a bit wishy washy compared to the reindeer, so I "reinforced" the front one with black soot distress ink.
As a finishing touch, I used the black glitter swirls that came out of the reindeer die in the corners. This meant cutting another reindeer out, which went into the stash but only briefly - see the next post after this one!
Monday, 30 November 2015
Clean and Simple
Just time to post my ClarityStamp Challenge card for the month.
The challenge this month was clean and simple - my usual approach is "keep going until you're happy" so this was a bit of a departure.
I really wasn't sure what to do, so in the end I went for something very simple indeed! I used my "borrowed from under the Christmas Tree" Wee Folk stamps again. They have gone back in the stash now!
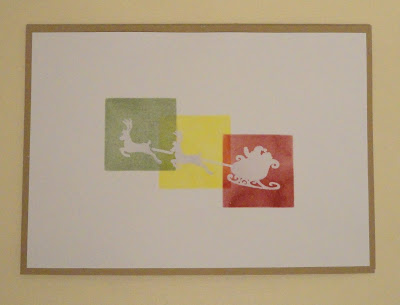
To make this I stamped the sleigh and reindeer onto Clarity stencil card with watermark ink, and heat embossed with clear powder.
I then positioned the abstract squares stencil so that the biggest square was over the middle of the page, and masked the rest with sticky notes.
Using squeezed lemonade distress ink and a blending tool, I filled the square with colour. I had thought I might need to add a bit of orange to make the colour intense enough, but actually it came out very strong.
I then moved the stencil and, using the same square, added red and green on either side. I wiped the image to remove the ink and bring it back to white. The overlapping areas end up orange and lime.
And then I stopped! It took a bit of willpower not to add more - a bit of faux stitching, a doodle or two… but I decided to stay true to the theme and leave it perfectly clean!
Just folded A4 kraft card in half to make a simple card base.
Just folded A4 kraft card in half to make a simple card base.
It's not my usual style, but I'm quite pleased with how it turned out. I think I could try a version with the image stamped in black instead, or with blue ink to give an impression of sky in the squares, with snowflakes. After Christmas of course, when I officially have my wee folk stamps to play with!
Friday, 27 November 2015
Family and Friends
This week's 52 Christmas Card Throwdown challenge has the theme Family and Friends.
I had to cheat a little bit on this one - I don't have a lot of character stamps, so I have "borrowed" one of my Christmas presents bit early, the ClarityStamp Christmas Wee Folk.
I had a great idea about how to frame the little stamped scene one night, I was really pleased with it, until the next day when I realised it's basically the same as a demo Barbara Gray had done on her blog. Ah well, at least they're going in at some level.
I started by cutting a bauble shape from card, keeping the inner and outer shapes to use and masks.
Putting the outer shape down first, I brushed in some landscape lines using iced spruce distress ink and a stencil brush. I also brushed round the outside to give a faint outline on the card.
I then stamped the tree and two of the wee folk figures in olive pigment ink.
Next I swapped the masks and covered the bauble to add colour round the outside. I mixed red and a little blue acrylic paint, then applied it with a make up sponge, sweeping from the middle out to avoid leakage under the mask.
I quite like the texture that the strokes of the sponge create.
Once the paint had dried I added more texture with a snowflake stamp and aged mahogany distress ink, first and second generation stamping.
At this point I had a bit of a disaster and managed to splodge red paint into the bauble!, So, start over again! I may be able to do something with the first attempt by covering it, or making a tag, but it won't do for the challenge. Unfortunately the bauble didn't come out as cleanly on the second attempt, but no time to redo it again. The pictures are a mix of the first and second run!
In the meantime, I stuck an adhesive sheet onto copy paper, and covered it in gilding flakes. Such a gorgeous finish!
From this I cut several large snowflakes using a tattered lace die.
I trimmed down the card to a square, and attached the gilded snowflakes, over the outside edge, and cut back the excess.
For the mount, I brushed iced spruce over the first layer to match the bauble, then made a second layer (or mat? I'm never sure) with double sided tape and more gilding flakes.
And there we are! Ran up to the last minute in the end, but I got it done!
Subscribe to:
Comments (Atom)

