Pages

Showing posts with label mixed media. Show all posts

Saturday, 26 March 2022

A junk journal card


It's my final week hosting the 52 Christmas Card Throwdown this year. I've chosen a technique challenge - I want to see something that moves on the card front.


I've been watching a lot of videos on junk journalling recently, and when I saw Luise Heinzl make this little dangle, I knew I wanted to make one for my card.

So this is a card that thinks it's a junk journal!

The dangle first - I printed the sentiment, then mounted on card, with tea dyed lint. I added it to a bulb ring I dyed with alcohol ink, with a snowflake charm.


I attached it to the card by gluing a Christmas glass piece on, with a bit of cotton ribbon underneath. I added distress crayon behind it to help it stand out - it looks really dark in the photos!

The background is a made with ink, brushos and a stencil, from my stash - I loved the burnt orange and green. The wood effect piece is also stash, and makes a pocket.


I added lace at the edge, and a cluster with a button. I sewed round the edges to attach the pocket - I think I should have gone round twice now I look at it!

To go in the pocket, I made a tag, using a stamp from IndigoBlu. I stencilled to add interest, and pick up the orange colour, and sewed round the edge.


Once it was in the pocket though, the deer are hidden and it looks a little dull. So I added another moving element - a paperclip. I die cut a snowflake from a scrap of the wood effect card, and mounted it on a circle I'd inked to match, with some more of the dyed lint.
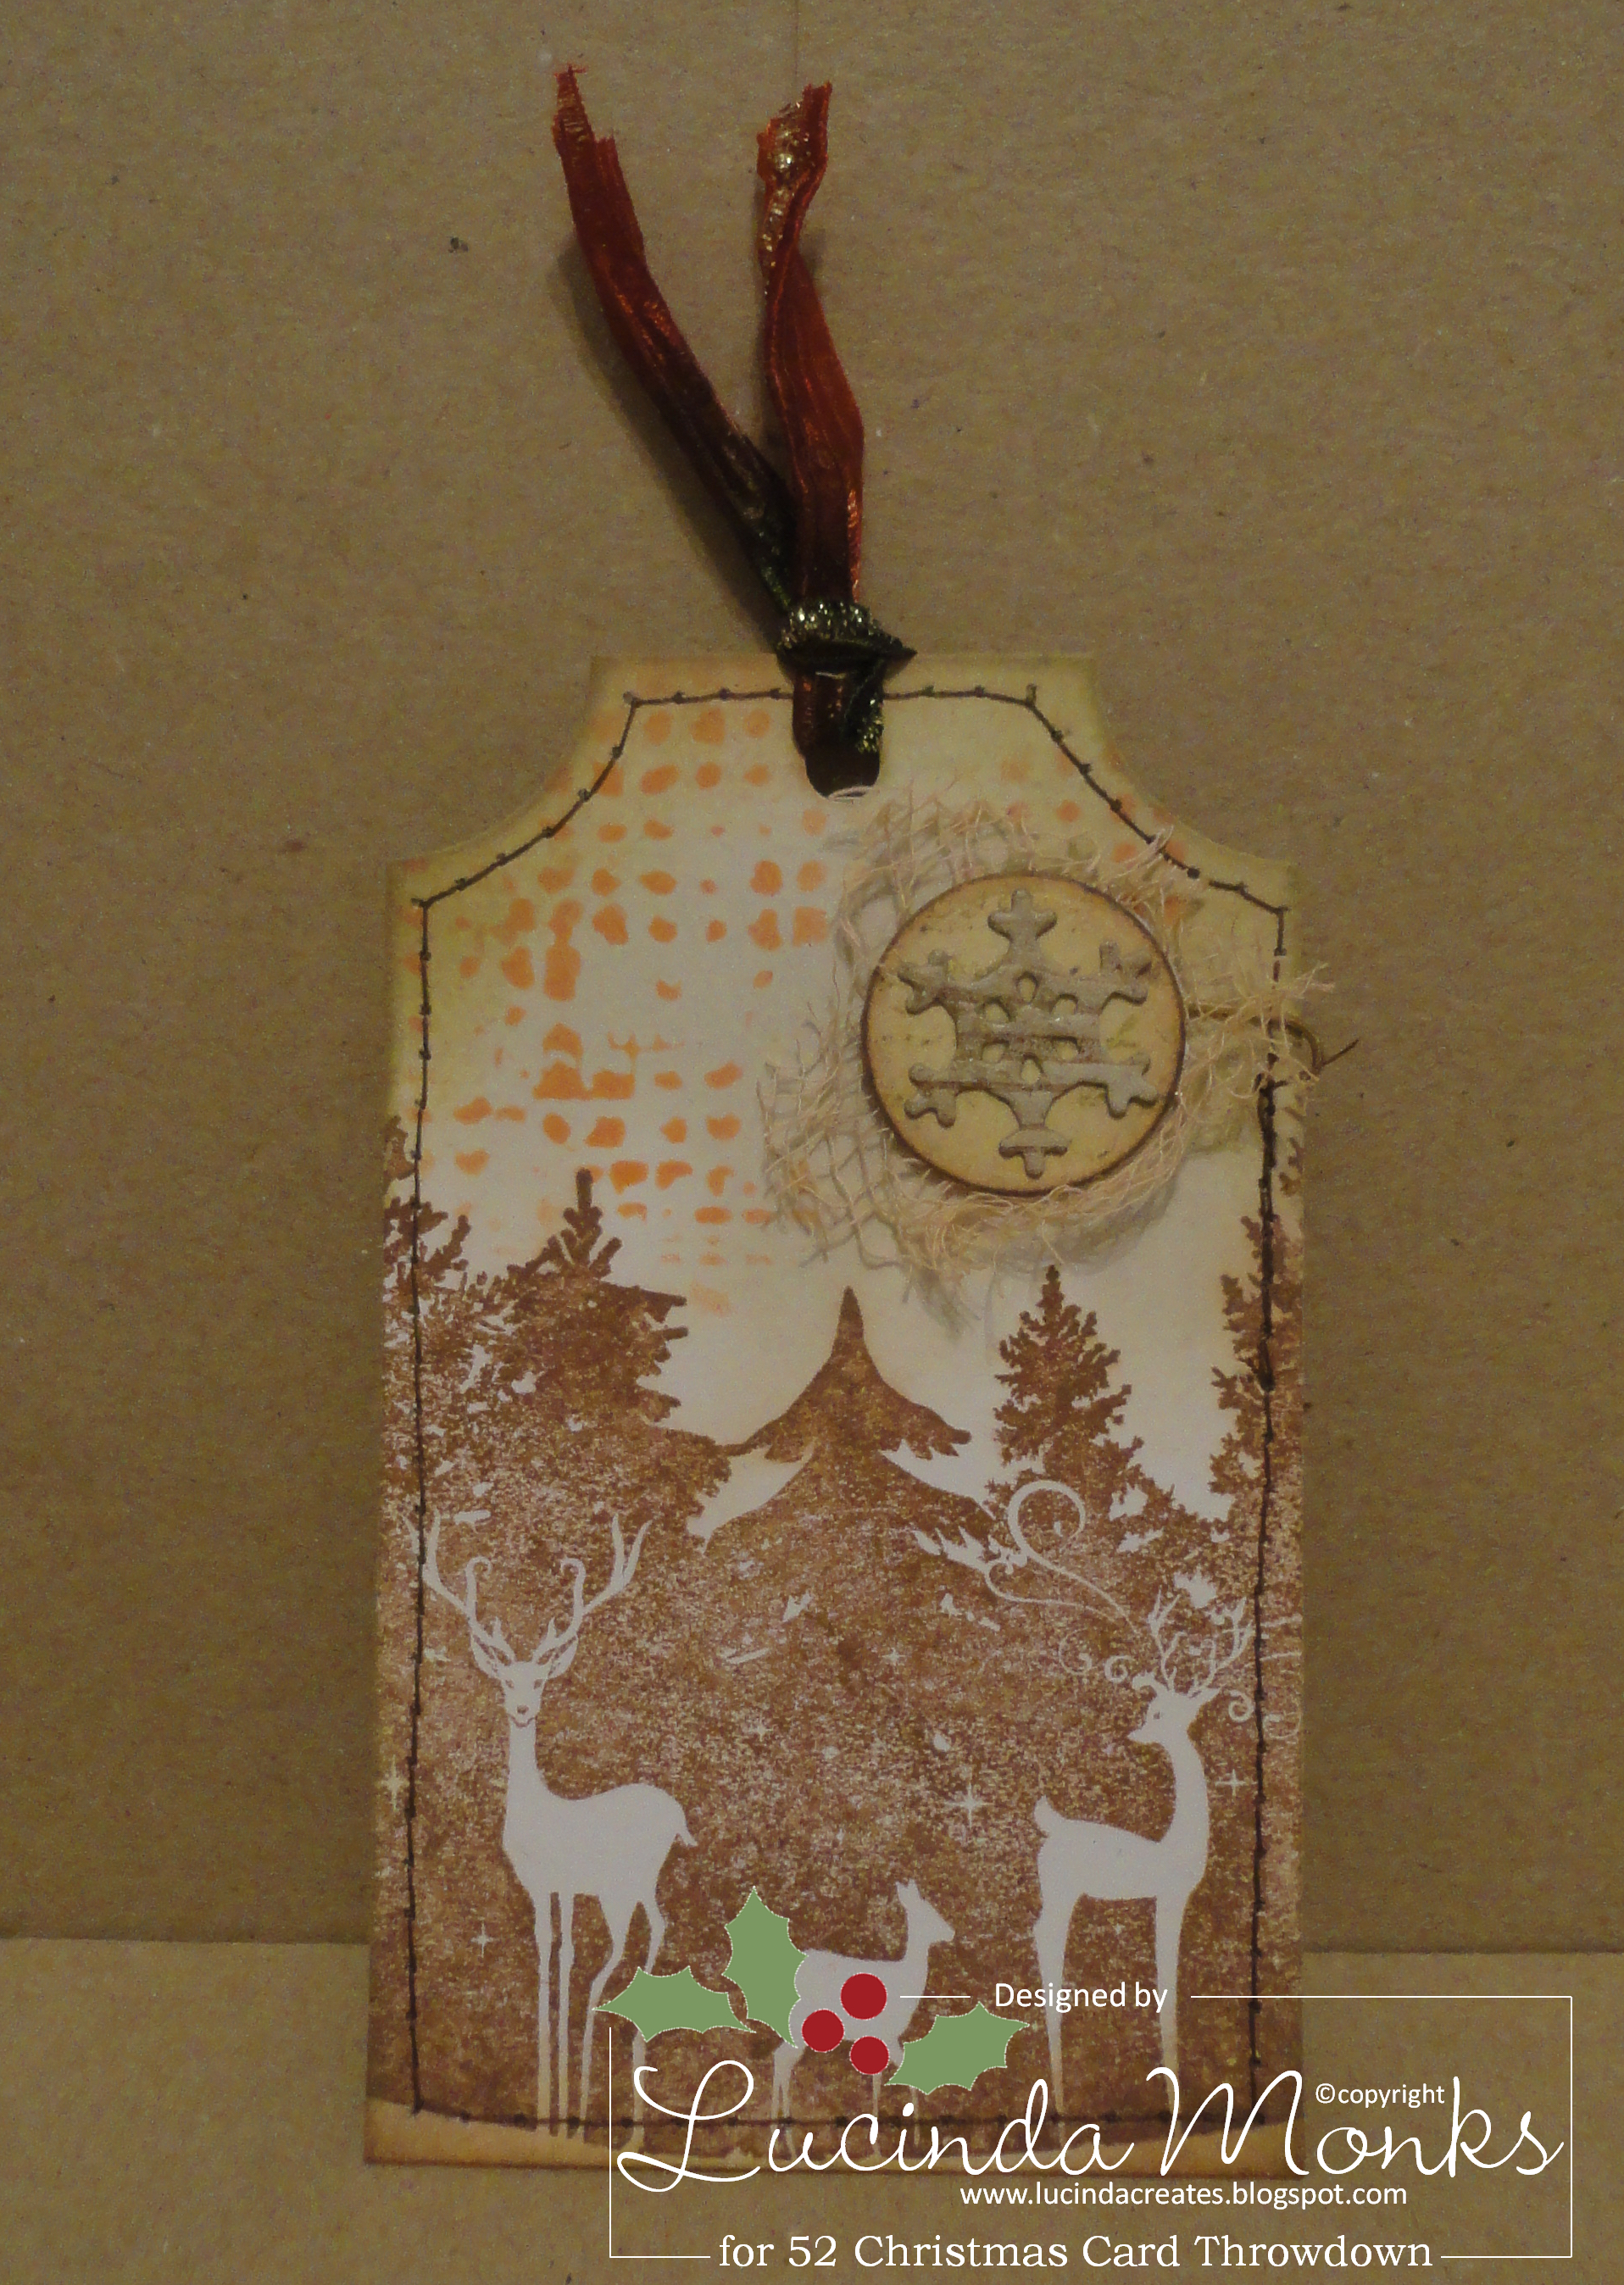


The whole thing is mounted on a 5x7 card blank.


I had such fun making this! It's a bit unusual as a card, but I think would be fun to receive as well.


To play along, visit the 52CCT blog. The design team have made some amazing cards, with lots of different ideas for moving elements, so go and check them out.

You have until Friday 1st April (no fooling!) to enter.

Sunday, 7 November 2021

Holly layers


We welcome Gill to host 52 Christmas Card Throwdown this month, as we enter the final run up to the big day!

As always, she starts the month with a sketch.


I went for a layered, mixed media card with a limited colour palette.

I started with an A4 sheet of card, and cut a 13.4cm square from it. I collaged on torn pieces of old papers - a dictionary, sheet music and a book page. I used transaprent gesso so I could add brushos over it.

I added the brushos to the centre of this piece and the whole of the other pieces from my A4 sheet. I used olive green, then added yellow for a warmer feel.

I cut a 14cm matt from one of the larger pieces. I die cut an ivy branch from the centre of this, being frugal, and another from one of the other pieces, as well as a holly die cut.

I tore a piece of the book page, and inked the edges, then a narrower strip from brusho card. The sentiment is stamped onto the blank edge of an old book page, and the edges inked.

The cream holly I originally die cut from a book page, but they didn't look quite right, so I used a scrap of plain card instead and inked in cream with brown edges.

I stamped some holly onto the collaged piece, and edged this and the matt with brown, before assembling. I added a bit of thread around the sentiment strip. I finished with pearls in the centre of the holly - I wanted tiny wooden buttons but didn't have any!


I'm very happy with how this has come out, it has a lovely earthy feel.


To play along this week, visit us at the 52CCT blog. You have a week, until Friday 12th November, to join in.

Saturday, 10 April 2021

Silver, silver, silver


Branka's colour challenge at the 52 Christmas Card Throwdown this week is Silver and White.


My first thought was to make something delicate and pretty with silver embossing, and dry embossing on white. And I'm sure we'll have some beautiful cards like that. But I wasn't in that kind of mood, I wanted to make something more grungy.

I started with super smooth white watercolour paper, and silver mica powder. I wetted the paper, mixed the powder with water, and painted and splattered it onto the card.


I used the one on the right as my background, and the other for die cutting.

I cut the background down, and die cut a zig zag edge.


I then overstamped the background with silver pigment ink and a few different stamps. 


The right side was a bit plain/dark, so I stamped and heat embossed with silver powder.

From the other mica powder piece, I die cut a circle, and the Noel shape and some snowflakes. I stamped parts of the circle with the silver ink.

I heat embossed a spare piece of card with my sentiment, then painted the edges with mica powder.

To mount, I cut a piece of white card and edged with silver embossing powder.

There was a lot of fiddling and rearranging before I got to a composition I was happy with!


I'm really pleased with how this has turned out. I didn't know if I'd be able to get this much variety and interest just using silver, but I think that with the different products and techniques, I have.


I hope this has inspired you to play! To join in with your take on silver and white Christmas cards, pop over to the 52CCT blog. The challenge is open for a week, to Friday 16th April.

Saturday, 20 March 2021

Pretty and slim


The third Saturday of the month is our theme challenge at 52 Christmas Card Throwdown. Goga has chosen "Slimline Cards" for us to play with.


I've been seeing these all over the place for the last little while, but haven't had a go - I'm a bit stuck in my 6x6 and 5x7 cards!

I had a bit of a search to see if there are specific measurements for these cards, but there don't seem to be. It seems to vary - in the US it's based on letter size cardstock, in the UK on A4 (and I don't know about elsewhere!).

I went with a DL card, i.e. A4 cut to two thirds, or 19.8cm along the long side, then folded. This allowed me to use the offcut for my topper, although I matte and layered so cut another.

This card was my play on Mother's Day, so no process photos I'm afraid.

I started with distress reinker in salty ocean, which I dropped onto the corner then spritzed to get it to run, down and across.

The stamping is in pumice stone distress oxide, with some frayed burlap.

I also stamped and drew lines and dots, and embossed in white, on the top and bottom.


I blended the browns round the edges, and also swiped a dark brown stazon ink on the very edge.

The holly and pine cone die cuts were smooshed through the brown inks, the snowflake was dipped into salty ocean. I overstamped the snowflake in cobalt blue archival ink.


The sentiment was also stamped in the cobalt blue, and edged in the browns.

The other touches are thread wrapped round, some sparkly white net, and a pearl in the middle of the snowflake.

The layer behind is blended with the two brown oxides.


I find this so pretty. I love the blue and brown together, and the shabby chic feel.

The different dimensions of the slimline card were fun to play with too. I have a couple of others that I cut and started, so can go back and play some more when I fancy.


To see the wonderful inspiration from my design team colleagues, head over to the 52CCT blog.

This challenge is open for you to share your slimline cards, until Friday 26th March. I really look forward to seeing what you come up with!

Saturday, 27 February 2021

Mixed media, with a twist


This week we have my last challenge as host of the 52 Christmas Card Throwdown.

For my technique/stash challenge, I have chosen "Mixed Media".


Mixed media is a broad definition, for this I encourage you to be experimental and loose with your materials, and layer up!

I wanted to make two cards - one with all my mixed media stash, and another to see what I could do using just standard card making materials.

I got the latter made, the first is in progress and I hope to be able to add it later. Homeschooling etc has taken its toll!

I started by getting the materials I thought I'd use together.


Design papers, in lighter colours and sticking to cream, red and green; distress ink in old paper, aged mahogany and brushed corduroy; three Christmas stamps; versamark and versafine clair black (I also used archival black); clear embossing powder; an embossing folder; glue stick; ruler; waterpen; plain card. I also used scissors and super sticky tape.

I started by cutting the card to size, then tearing the DP and gluing to the base. I used a ruler for the sides to match the edge, or distressed with the scissors, so they were straight and fitted.


I then stamped the holly in versamark and embossed in clear, in several places across the card. I was hoping these would resist the ink added below, but they didn't show as much as I'd hoped. But it all adds to the layers!


I ran the card through an embossing folder for some texture.


This looked lovely.


The next step was to add ink. I applied the old paper ink directly to top of the page, and also to the mat and used the waterpen to pick it up and add drops down the page.


I then added the aged mahogany to the side. Unfortunately, I wasn't paying attention so added it to the right, not the left. Oops! It didn't look right at all, so I added it to the left as well. So it ended up much red/pinker than planned!

Before I took a photo, I also stamped the music stamp, in black archival, in the centre. I wiped the ink off the edges of the stamp to avoid a harsh line.


While that dried, I stamped the sentiment onto another piece of DP - in black versafine clair, and embossed in clear. I tore the edges, and inked.


I did the same for the holly stamp.


And then I tore out an image from a piece of the DP, and edged it as well.


Then it was a case of fine tuning. I edged the card and the sentiment with black, added more of the old paper to the background, sponged some old paper onto the sentiment, extended the music stamp downwards, tweaking until I was happy with the balance.


So, with basic supplies, and nothing specialist for mixed media, I've been able to create a multi layered card, with loads of texture and interest.

I don't even mind the extra pink I added, although I'm curious how it would have looked with more of the DP showing through.

I do love the richness created with the layers.


To play along with the challenge, visit us at the 52CCT blog. You have a week to enter, it closes on Friday 5th March.

Good luck, and most of all, have fun, experimenting and playing with this great technique.

Saturday, 28 November 2020

Gilded CASE


Gill's final November challenge at 52 Christmas Card Throwdown, and our last "regular" challenge for 2020, is a stash challenge.


Gilding flakes or foiling is what we're looking for.

I CASEd one of my own cards from 2017 for this. I'd forgotten this technique until I looked back!

The base is champagne modelling cream, brayered over the card. I then stamped in brown over the background. I used adirondack ink initially, as below. In my previous post I said this dried fine - I must have left it for a while as this did not dry, even with a heat tool! So I started again and used archival ink. Presumably the first one will dry eventually and can be used.

Next I applied bronze modelling paste through a stencil, and added gilding flakes over it while wet. I had to be careful not to squish it.


And the same again with a stag head stencil.


When the paste dried, I wiped off the excess gilding flakes to reveal the stencil design, with random metallic flecks over the bronze.

For the sentiment I used an offcut of the card and embossed with copper powder. I wiped a little bronze paste around the edge. The mount has dark brown stazon ink added.


I cut the base to size, and sponged the archival brown around the edge. I then edged with the stazon dark brown for a stronger frame.


Quite a vintage look to this one, with a shabby chic vibe too. But the shine gives a bit of a festive, celebratory feel too.

I do like these layerd cards, built up from plain white piece of card!


To join in with our technique challenge and top up your card stash ahead of the main event, visit us at the 52CCT blog.

You have until Friday 4th December to play along.

Saturday, 3 October 2020

Christmas sketch


Wow, it's October already - and the weather's turned here in the UK so it's starting to really feel Christmassy!

Majda is our host at 52 Christmas Card Throwdown this month. This is the sketch she's chosen for us.


I couldn't resist snowflakes for this! I wanted to do something quite quick (didn't work out that way though) so pulled out two backgrounds from the stash.


I cut them to size - 14 by 14 cm for a 6x6 card blank.


The eagle eyed will have noticed that one doesn't look like the photo at the top! I decided the metallic one didn't work so swapped it at the last minute for this background from the stash.


I edged the backgrounds in gold paint, and then in black ink.

For the panel I had the idea to use a framed lattice. I cut the frames and lattices separately. The fine lattice is a Tim Holtz corner die, so I had to turn it four ways to get a big enough area - it's testiment to the quality of the card and the die that I managed it without cutting through it.


I cut my snowflakes from the offcuts of the metallic background. I used a mixture of sets. I've recently sorted out my dies and put them in folders on magnetic sheets so they're much easier to find - so I'm enjoying using the ones I'd forgotten about!


I needed two small ones for each card, which I heat embossed using the cosmic shimmer mixed media powders.


I love these powders so much!

The rest I painted with gold paint as a base, and then heat embossed some layers.

For the snowflake for the red background I used four layers, heat embossing in black, gold glitter and copper glitter.


The other large snowflake had two layers and a gem - I never usually use these, but have a few for the odd occasion they're just the thing I fancy. I also added the copper glitter embossing powder on the smaller layer.


When I started putting the cards together, I decided the large snowflakes needed some defintiion, so die cut the large snowflakes in black and put them behind the gold, offset slightly.


For this one, I also stamped some black swirls, I felt they were needed.

I love the prettiness of this, the snowflake die is gorgeous.


This was the background that I originally had in mind when I planned the card - and I managed to find it in my extensive stash! It was made with petite gel plates and stencils. I love the flash of green.


I hope you have fun playing with this great sketch. The challenge is open until Friday 9th October for entries, at the 52CCT blog.