Saturday, 31 October 2015
Clarity Challenge for October '15 - Stencils
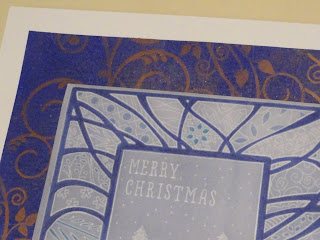
Here is my entry for the ClarityStamp October challenge. The theme is stencils.
This was a slightly tricky one for me, as I only have 3 Clarity stencils (although as I took advantage of the offer on stencils this month, several more have just arrived and are ready to go under the Christmas tree for me). I've been pondering all month what to do, and have used stencils on other projects (including an anniversary card for my parents which I'll blog when I get a moment) but they all used non Clarity elements so couldn't be entered for the challenge.
Finally, watching the Groovi shows on Hochanda this week gave me the itch to use my Groovi plates, so I've combined those with the stencil for this card.
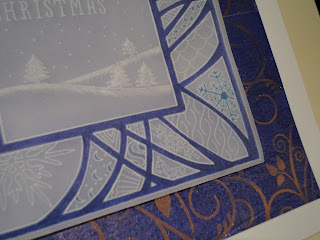
I started with the Flare Frame stencil, and used it as a template to emboss a piece of parchment, using the soft side of the mat. This was the trickiest part, getting the pressure right to give a clean line without puncturing the parchment. I used 3 Groovi plates or borders at a time to hold the stencil down and prevent it flexing.
Next was the fun part. I filled each of the spaces I'd created with different patterns from my Groovi plates, borders and the Groovi mate. As I wanted to make a Christmas card (I have a lot to do still this year) I used a lot of snowflakes, as well as the Christmas border, but also took patterns from just about all of the plates I have. I really liked this part, searching out interesting shapes and patterns, it's something I'll do again.
For the centre section, I used the bunting wave and alphabet border to write the greeting, then used the landscape plate from the starter kit and the trees from the Christmas border to make a simple scene. I used the dots from the basics border to add snowfall.
I left this part of the project and moved onto the background to go behind the parchment. I wanted a rich blue to make the white line art stand out. I spread cobalt blue acrylic paint on the gelli plate with my brayer, and pulled a plain print with Clarity stencil card. There were white areas remaining, so I repeated the process, brayering in the perpendicular direction. Then, to add some interest, I coated the gelli plate in paint again, pressed paper towel in to leave a pattern, then printed this onto the same card.
The circular pattern is subtle but is there, and the colour is nice and intense.
To add interest and use another stencil, in keeping with the theme, I coated the leafy swirl stencil (my absolute favourite and must have) in watermark ink and embossed it onto the card with my grand calibur. I added bronze mica powder to pick up the design.
I think for this purpose, metallic pigment inks work better than watermark ink, they seem to give a stronger impression.
Back to the parchment. I wanted to pick out elements of the design to complement the backing paper, so I created an outside border to contain the design (using the straight line as the nested squares plate is still on my wish list!).
I coloured the stencil lines in a purpley blue. I used a watercolour pen as I liked the colour, but it wasn't the best choice as it didn't take to the parchment very smoothly. Fortunately, viewed from the front the parchment is quite forgiving.
I was very brave and tried a little white work in the centre panel. This is still very new to me, and I struggle with the patience needed to work slowly and gradually. I will keep working at it, as I love the effects that can be achieved.
I also picked out elements of the border in a turquoise and light blue, using sharpie pens this time, which I know work well with parchment.
I wanted to keep the colour very sparse and subtle as I like the effect of the crisp white lines and I didn't want to detract from that.
At this point I changed tack a little. I wasn't happy with how my back ground looked behind the parchment - it was too dark, and the swirl pattern didn't really show. I preferred the lighter blue on my waste paper, where I'd cleaned my brayer. That wasn't wide enough to use, so I recreated the effect as closely as I could on another piece of stencil card.
I then trimmed and scored the parchment, and cut this new background to size to make a wrap.
So this is the finished parchment work.
I didn't want to abandon the original background though, as I did like it, so I extended the leafy swirl pattern, using copper pigment ink this time, over the whole sheet. I used a versamark pen to fill in where there was an obvious edge to a part of the pattern, and added the bronze mica again.
Then it was a matter of choosing which area to use, and trimming back to a 20cm square to mount the parchment.
I mounted the whole thing on a 23cm square of white card, and my card was finished.
Post script - I'm very proud to say that this card was chosen as one of the top 5 entries for the Clarity challenge in October.
Friday, 30 October 2015
Musical trees
This is my second entry for the 52 Christmas Card Throwdown Challenge Week 43.
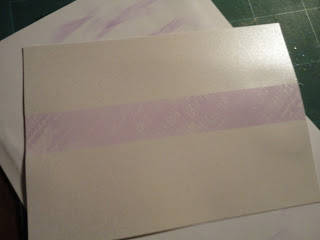
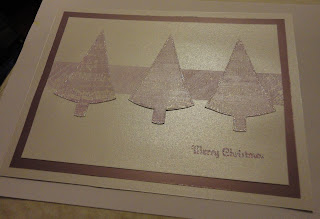
For this card I cut an A4 sheet of centura pearl hint of silver card into two halves. On one, I masked off a central panel with masking tape. I stamped both with a musical notation background stamp in watermark ink, then heat embossed with clear powder.
I applied a purple pigment ink to the embossed areas (the masking was still in place) using a make up sponge, then removed the masking tape to show the panel.
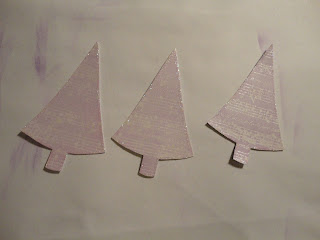
I drew a simple Christmas tree shape on waste card as a template, then drew round it on the fully embossed card and cut some trees from it.
As it was Christmas I couldn't resist a bit of glitter, so I edged the trees with a versa mark pen and added a sparkly embossing powder, and heat set.
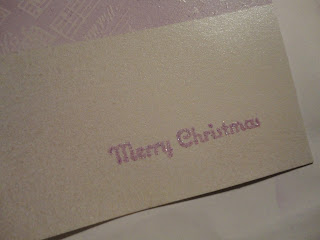
For the sentiment I used the same purple ink to stamp, then added the sparkly embossing powder and heat set.
I added the trees to the panel, then layered on matching purple pearlescent card (it matches better than the photos show!), then again on more centura pearl.
The result is quite clean and simple, in non traditional Christmas colours, with a touch of festive sparkle.
As this is one that is too large for the post, I think I may revisit it with the foam tape and raise up the trees and layers for more impact.
I'm still struggling with photographing my cards - my silvery card has turned yellow and my lilac has gone plum, not to mention glare issues. It doesn't help that I'm usually working in the evening under artificial lights.
A Partridge, a Pear and a Tree
I made this card for the 52 Christmas Card Throwdown Challenge, week 43.
The challenge theme was to use resist embossing, which is a beautiful technique I love, so I ended up making two cards for this challenge. The design team cards and other entries have some brilliant examples of the technique, it lends itself very well to snowflakes.
For this card I wanted to use a set of "Twelve days of Christmas" stamps. The set includes a partridge and a pear, but no tree, so I pulled out a wooden block rubber stamp of a twirly tree that I really like. I often use this stamp just for the swirls in backgrounds, but today I was using the full tree.
I stamped the tree onto Centura Pearl hint of silver card with watermark ink, then added the partridge in the branches and the pear hanging from it. I embossed with a clear powder. I then used a frame die and drew round it with a versa mark pen, then embossed the line in clear as well.
I wanted a moss green, so mixed squeezed lemonade and bundled sage distress inks on a blending mat and painted it over the image. The embossed areas resisted the ink, making the design stand out in white.
I cut the image out using a larger size of frame die.
To layer up I used a square of uncoloured centura pearl, then a layer painted to match the image. I cut a shape from the centre of this layer first to try to be a bit frugal with the card.
I mounted the layers together and onto a 6x6 card base. I left the layers flat as Christmas cards usually have to posted, but these could easily be mounted with foam to give more dimension.
Tuesday, 27 October 2015
Acetate foliage Christmas Card
This is a very quick (and last minute) card for the 'Tis the season challenge 53.
The theme was cards inspired by a picture of ice skates, and the aspect that struck me was the fir sprigs in the skates. I've been meaning to try this technique with foliage sprigs on acetate for a while, so this was the perfect opportunity.
I used a fir branch stamp I got in a charity shop, which has proved to be a fantastic find. It's an old school rubber stamp on a wooden block, and stamps a very detailed and crisp image.
I stamped two branches and embossed with Earthtone Olive Wow Powder. I then mixed up a little of the same embossing powder with gold mica powder and made two more branches. I've not mixed up embossing powders before, but it worked really well. I thought I'd been very frugal on the mica powder, but I think I could use less for a greener result and still have the shine.
I cut each of the branches out, not having to be too fussy as the acetate is clear. I cut into two of them to separate the sprigs.
The background was a simple landscape, with two hills inked with a brayer and makeup sponge in a light blue, then I stamped a simple sentiment using the same ink mixed with a darker blue. I added snow with a white pen, but it doesn't really show.
I cut an aperture in olive green card using a X Cut frame die, and put all the pieces together on a 6x6 card.
At this point I thought it needed a little something else, so I cut and embossed a small bow from gold card using a Die-Lectables die and attached it at the bottom.
A quick card to make, but I got to try a new technique or two, and I'm pleased with both of them. Look out for more acetate foliage sprigs on Christmas cards this year!
Friday, 23 October 2015
The Wild Woods
This is my entry for the 52 Christmas Card Throwdown October theme challenge.
The theme is the wild woods, inspired by John Rutter's Wild Wood Carol.
I struggled a bit with what to do for the challenge - I had a lovely picture in my head for a moody woodland frame with shy deer in the centre, but didn't have the stamps and so on to make it!
So last night I came up with this as a bit of a last minute entry. It has the benefit of being quite simple to make, so I could repeat it for more cards, and there are numerous possibilities for variations on a theme. I'd like to do a lilac and silver sparkly version.
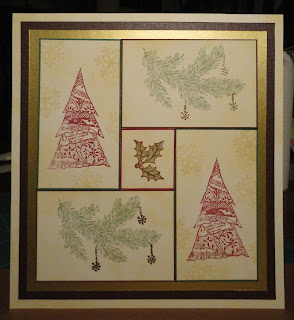
I used the collage Christmas tree stamp by ClarityStamp and a wooden block fir branch stamp I bought in a charity shop. I measured these and cut card to size, then worked out what size the middle piece needed to be.
I used antique linen distress ink to age each piece, then stamped the tree in burgundy, with snowflakes in the background in antique linen. The branches were stamped in bundled sage distress ink, then I added a small snowflake as a bauble in gold embossing powder.
The holly sprig was stamped in vintage photo distress ink, then I painted it with burgundy and bundled sage inks.
I edged the separate pieces of card with maroon, green and brown sharpie pens, then mounted them onto gold card.
The next step was to choose a colour to matt on to - festive green or warm brown?

I went for brown, then aged a larger piece of white card with antique linen for another layer. To get my layers even I used a perfect layers ruler, the 1/4 inch side.
So that's the finished card, a collage tree theme in traditional festive colours.
Monday, 19 October 2015
A card with a difference
This weekend's project was a departure from my usual style. My daughter turns one next month, so her daddy tasked me with making a card for her to send into CBeebies. (For those who aren't subjected to CBeebies by little ones, it's the BBC's young children's channel and the presenters show birthday cards and read birthday messages between programmes.)
This was supposed to be a quick and simple, fun make that I knocked out in an hour or so - but ended up taking most of the weekend! This was partly due to technology issues with my printer and camera, partly to bits I'd cut out mysteriously disappearing (to be found hours later on the underside of something), the scale - it's about 43cm by 54cm - and also my tendency to grossly underestimate the work involved in my plans.
Anyway, it was (mostly) enjoyable, I think it turned out well, and most importantly, it was put in the post this afternoon to get to the BBC in time. Fingers crossed it gets chosen to be shown!
Thursday, 15 October 2015
A Blue Christmas
 This card was made for the 52 Christmas Card Throwdown Challenge - I saw the theme of blue or purple plus a metallic, and had an idea for a gelli plate card. It didn't quite work out as I'd originally envisaged, I've not really got to grips with the gelli plate yet, but I like where it ended up nevertheless.
I started out making some gelli backgrounds with cobalt blue acrylic paint. For the first I used crumpled paper to give texture, then I noticed the pattern on my paper towel and gave that a go. It worked well, although on the first attempt I removed a lot of the pattern from the centre when I applied the second coat of paint to pull the print.
There was more white showing through than I wanted. I tried blending antique linen distress ink over, to soften the white, but it was a bit blotchy. If I was doing it again I think I'd apply it before pulling the print.
Next out with the leafy swirl stencil from Clarity Stamp. (I love this stencil, I could use it in most projects. Although it's not explicitly Christmassy, I think with the right colours it does have a Christmas feel.)
I used a gold pigment ink pad, and applied it to one of the prints through the stencil. That was just for the stash though, as the point was to cover the stencil in ink, which I then embossed onto another print using the Grand Calibur.
The colour was very subtle - in other words, didn't really show. So I added gold mica powder to both prints, which brought out the pattern a lot more. You can see the negative in the picture above.
The positive, embossed pattern has a shadow as the stencil obviously moved when I put it through the machine in both directions. Fortunately it looks like it might just be deliberate!
This is where I changed my plan and went for a circular design. So, I cut a circle from my embossed piece using a tonic die.
At the right angle you can really see the shine from the mica.
Next I dug out some gold mirror card and cut a ring the same size, as well as a smaller ring and two baubles from the Spellbinders Shapeabilities 2012 Holiday Tree die set. I managed to cut the smaller pieces from the centre of the larger ring to avoid waste.
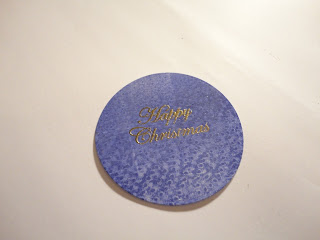
Time for the sentiment. I cut a smaller circle from the print I'd embossed, but an area that hadn't been covered by the stencil. I stamped "Happy Christmas" using watermark ink, then heat embossed in gold. I also heat embossed chains on the bigger circle for the baubles to hang from.
Time to assemble the pieces. I was going to use a 6" x 6" white card base, but I remembered I'd seen someone on TV talking about framing your cards for more impact, so decided to take their advice and go larger (to just under 8" x 8"). I made a matching matt by painting white card with the cobalt blue paint I'd used for the print.
Then it was just a matter of glue and tape, and here's the finished card.

I struggled with photographing this to show the shine but avoid glare. I must try to do a card without mica and metallics next time to make my life a bit easier!
As well as the 52 Christmas Card Throwdown Challenge, I have entered this for the C.R.A.F.T. Challenge 53 - Christmas, Crafting With An Attitude Challenge 8 and Crafty Girls Creations Challenge 6.
Saturday, 10 October 2015
Joy Always Inspiration
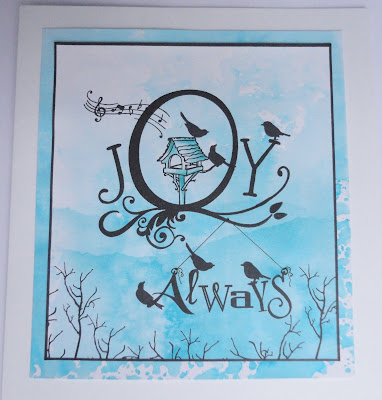
I can't claim today's artwork as my own. I received this gorgeous card in the post this morning from Barbara Gray of Clarity Stamp, after I won a little competition on her blog. Isn't it beautiful! Definitely one to display for inspiration.
The step-by-step of how she made it is here.
I voted for the cloudy background, which is what I have on my finished card.
I'm hoping to try out the rainwater backgrounds next time it rains - I didn't quite get organised enough on the couple of rainy days we had this week.
And the icing on the cake - a Clarity voucher as well. I may have to treat myself to some of her stencil brushes!
Wednesday, 7 October 2015
Fused Glass Light Catcher for 30 years of friendship
Last month, my best friend Susan and I celebrated an anniversary - 30 years since we first met. To mark the occasion, we spent a crafternoon together. (For our 20 year anniversary we had a weekend in Amsterdam; our lives have changed somewhat with the arrival of three little 'uns between us in the intervening decade!)
We went to ArtShed in Ware, for a Glass Fusion workshop with Lynn. ArtShed run a number of different courses, short and long, and the shop turned out to be a veritable treasure trove - everywhere I looked there was something else that I would love to have in my home.
We started with demos and a bit of practice at cutting glass into strips, squares, curves and circles, then we were set loose on our sun catchers. I went for a bright, abstract design. After playing safe with straight lines at first, I struck out into some circles and curves as I gained a bit more confidence - you can see the change as I worked from top to bottom. We also tried small jewellery pieces - I made a pendant.
Our glued designs stayed behind to dry then be fired in the kiln, and Susan picked them up a couple of weeks later. I finally saw her this week and got my finish pieces back, and here they are!

Not a lot of sun today for this to catch, but nevertheless I think it looks good with natural light behind it.
They're not perfect by any stretch of the imagination, but for a first try I think they're very pleasing, the sun catcher has gone up in the dining room window and I need to find a chain for the pendant. More to the point, we had a really enjoyable, fun afternoon - and here's to the next 30 years.
Subscribe to:
Comments (Atom)


